
Welcome to another edition of Saxony’s greatness; this time with Saxony Mechanical! Gunter, Nacht and Tag return to take no prisoners, and with the Mechanical Mat, there isn’t a whole lot to stop them.

Mechanical Mat.
The Mechanical Mat in Scythe seems to be designed to streamline itself with upgrades and spit out Power and Mechs consistently. The trick as with all other mats is finding the rhythm this mat thrives on with each faction and the available hexes of each base. Unfortunately, Mechanical doesn’t have one particular high coin generating action and instead spreads the wealth of the mat between three action rows. This means we get an average influx of coin, but won’t be raking it in as there’s no way we’ll be using each row to its fullest potential. Regardless, let’s take a look at our rows of actions and find the strengths and weaknesses:

First Row: Trade / Upgrade (3 Oil).
- At first glace, this row looks unimpressive. 3 Oil to upgrade and no coin payout. In fact, we net negative $1 per action on this row. But it has more potential than that, and though it’s not even close to our strongest row, it’s still helpful.
- Thanks to Saxony’s position, we start on a Tundra, so we can Produce and then Trade / Upgrade by turn 2.
- Upgrade also can be discounted by 1 Oil. So with our first upgrade action, we can turn this row into a seamless action by trading for 2 Oil and upgrading each use.
Second Row: Bolster / Deploy (3 Metal) + $2.
- This is the strongest row for Saxony. With our affinity for getting into combat, it’s great to have a fall back action to build up power and deploy a mech between our movements.
- Being able to discount our Metal cost down to 2 and then only 1 for Deploys after successive upgrades is fantastic and quickly frees us from needing our workers to stay put on hexes for continual production.
- In the four actions it’ll take to get our Mech Star, we’ll net 12 Power and $4, The coin isn’t impressive, but the Power surge means we’ll potentially be in reach of the Power Star during our gameplay.
Third Row: Move / Build (3 Lumber) + $2.
- We’ll move a great deal; however, acquiring Lumber is always a difficulty with Saxony.
- Upside: Lumber cost can be discounted down to 2 Lumber per Build action making it possible for a fast build if the resources are available. As well, it’s nice to have a build action under our move action as it allows us to move our workers where needed for a Structure placement and/or bonus.
- Downside: as always with Saxony, Lumber production takes several things to happen like mechs being deployed and move actions. Trading for Lumber isn’t impossible, but again it takes an additional action that will only benefit our Build action which tends to pigeon-hole us.
- If we’re able to Build, it’ll likely come from stealing resources after combat or from an Encounter.
Fourth Row: Produce / Enlist (4 Food) + $2.
- We’ll always produce, so this row can’t be chalked up as a loss, but due to the initial cost of our Enlist, this row is tough to complete top and bottom for Saxony with any regularity.
- Upside: with two upgrades, we can discount our Food costs down to 2 which makes an Enlist a lot more possible to grasp. Plus, being under our Produce action, it keeps the door open to being able to squeeze an Enlist into our regular gameplan without adding additional turns.
- Downside: 4 Food is a really high initial cost, and getting two upgrades to discount it down means we aren’t using our upgrades for our strongest options. As well, Saxony has a lot of work to put forth to reach the closest Farm for production, including mech deploys and several move actions.
- As like our Build action, it would seem if we’re able to Enlist, it’ll have to come from Encounters or resources pilfered from the fields of combat.
Strategy.
We now know our mat’s strengths and weaknesses, and hopefully can put that knowledge into some semblance of tactical planning. As such, our next step is to strategize how to utilize what we know into conditions for victory.
To begin, our focus should be on how we plan to achieve the maximum count of Stars for our game. Right away, we know as Saxony that our Faction Ability is “Dominate” which states: “There is no limit to the Stars from Combat and Objectives.” To be fair, we only get two objectives per game, so we’re limited to a maximum of two Objective Stars; but still, that’s double the potential of other factions, so we’ll want to take advantage of that.
Combats are also a great potential. We may not have the ability to get six Combat Stars, but with Dominate, we have the potential to get Stars for as many as we can. Thankfully, Saxony is somewhat built for combat. We only get 1 Power to begin the game (which seems like a fair limitation), but we start with 4 Combat Cards, and if you think of the potential stats with that, we’re starting the game with the possibility of anywhere between 9 – 21 combined force between Power and Combat Cards. Add to that the Mechanical Mat’s strength in Bolstering and Deploying, and it would be a missed opportunity not to focus on Combat Stars.
Because it’ll take four Bolster / Deploy actions to achieve our Mech Star, we’ll want to consider getting our Power Star as well. Since we net 12 Power over those actions and start with 1, it would seem plausible we could make up the 3 along the way. However; Saxony benefits from a lot of combats, so the chances are that we’ll be depleting that power as much as we’re filling it. Not to mention later Produce actions will start costing us 1 Power after we get out our first 5 workers. The Power Star shouldn’t be off the table in the event the game makes finding combats difficult, but we shouldn’t sacrifice our abilities to make it happen.
We’ll Produce for Metal and Oil to start the game because we need upgrades to streamline our benefits of top row actions and the costs of bottom row actions, but trading and upgrading won’t have much use after we get our Deploy cost fully discounted. So to spend additional turns just to get our Upgrade Star doesn’t seem realistic.
Getting a Build Star isn’t going to happen because we can’t spend turns moving to Forests to produce Lumber, nor can we afford using Trade actions to get Lumber. We won’t be able to divide our focus without restricting our ability to get the Stars we have the easiest access to achieving.
Considering the Enlist Star, it would be difficult for us to get much more than an Enlist or two off of Encounters or chance scavenging Food from a combat. To use Trade or Produce actions to generate Food would also be a waste of turns that would only delay the momentum of our gameplan. I love Enlists, but having a strategy in this combo that includes and Enlist Star isn’t worth trying in my opinion.
As we Produce, we know we’ll want a couple additional workers to help with that, and typically it isn’t much of a stretch during a game to throw a few workers on a Village for a produce action to get the Worker Star. So, we’ll have that as a frontrunner.
All in all, it would be to our benefit to plan on getting the Mech Star, Objective Star(s), Combat Star(s), and Worker Star, with a flex plan of the Power Star as a fallback.
Objectives.
As with every game, we need to take a serious look at our objectives before we start. Something a lot of players mistakenly do is disregard their objectives as optional. With Saxony, you can get a Star per objective – meaning two potential Stars. So objectives aren’t something we should disregard at all. As we look at them we need to ask:
- Is it possible to accomplish these during normal turns, or do we need to do something special? E.G. take additional move actions to occupy certain hexes.
- With our mat, is it likely we’ll be able to accomplish these without derailing our end game? E.G. trying to build structures when it takes half the game to even acquire the workers and hexes to do such.
It’s always best to have a semblance of a plan in mind with objectives. It’s easier to decide not to get objectives mid game than it is to realize we’re short on Stars and have to rush around the board to complete an objective.
Objective Examples.
For this strategy, we played through two separate games.
In the first playthrough, we had “Diversify Production” which basically states we have to control one of each primary terrain type (Tundra, Mountain, Village, Farm, and Forest) and have a worker on each. This is pretty tough as in normal gameplay, we don’t typically split our workers to individual hexes like that because at most we can only produce on 4 hexes (2 to start, 1 with upgrade, 1 with Mill), and rarely do we ever need to get all resources. That being said, this can be possible during the final turns when we move to occupy more territory for endgame scoring. So, not impossible, but difficult.
We also had “Technological Breakthrough” which says we have to have a Factory card and no upgrades at the end of turn. The difficulty with this objective is that it’s conditions limit us to either rushing to complete it so we can upgrade or to forego upgrades in our gameplan. Both of which actually inhibit us more than help. Since we have a strategy that relies on a few upgrades, the first as early as turn 2, we’ll need to pass on this objective.
Now, contrast that with the second game, and we can see what it looks like to have two very possible if not easy objectives:
“Foundations of the Empire” says if we have six of our tokens (workers, mechs, hero, or structures) on one hex at the end of turn we can complete this objective. The nice thing about this objective is that something of this sort can happen anytime within a game, especially with Saxony’s benefit to crowd onto Tunnels and pounce on opposing factions. Also, one of the easiest methods to combine with this objective is leaving workers on a Village to produce and get the Worker Star – as you’ll see we did in our second game. And just like that, two Stars with one action.
The second objective of our second game was “King of the Hill” which says that if we control the Factory with the most power or tied for the most power of other factions, we can complete it. This objective puts a bit more pressure on us to get to the Factory quickly because believe it or not, the early game is the easiest time to have the most power as all the other factions are slowly bolstering up. For Saxony Mechanical especially, we have no problem building power quickly, so there’s no reason to delay and have to wait around hoping other factions will lose power from combats.
Saxony Mechanical Strategy Overview
For this combo, I wanted to try something a bit different. I received really difficult objectives on the first playthrough that I either couldn’t complete or would be out of the way to complete. So, I wanted to run another playthrough where I got two objectives that I had no problem completing. Both game openings are the same and the strategy only diverges once we hit the first Encounter. But for the sake of looking at flexible tactics and having more options to get Stars, I figured it would be a fun example to show and highlight two playthroughs attempting to follow the same strategy.
Saxony Mechanical Step by Step Strategy (Game One).
Here is our game where the objectives just weren’t there. We made the most of what we could do, but of course it’s easier to have the flexibility of potential objectives.
OBJECTIVES: Technological Breakthrough, Diversify Production.
- PRODUCE: 1 Metal, 1 Oil.
- TRADE: 2 Oil. UPGRADE: Bolster / Deploy.
- PRODUCE: 1 Metal, 1 Oil.
- BOLSTER: 3 Power. DEPLOY: Speed Mech on Mountain.
- MOVE: Hero and Tundra worker to Village Encounter.
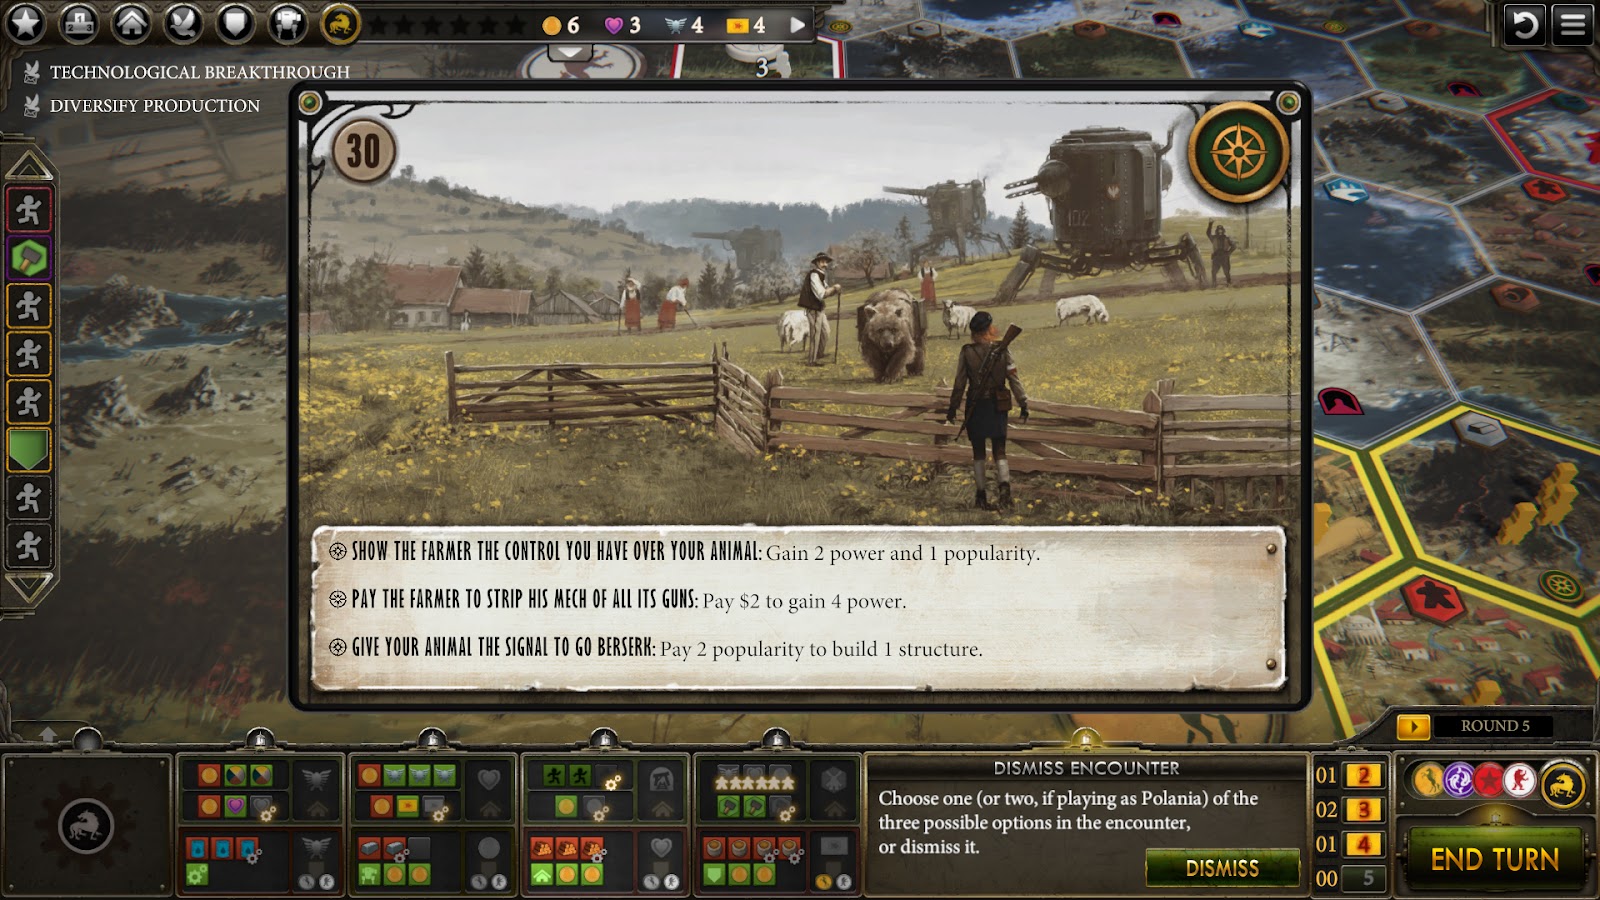
- Encounter: We’d prefer anything that gave us a bottom row action. Aside from that, resources enough to complete them and spare us a turn. If nothing else, some Combat Cards and/or Power would be great.
- We received Encounter 30 and paid 2 Popularity to build a Mine on the Village. This helps us by allowing us the easy ability to move our Hero, mechs, and workers from the Village onto the map.
- PRODUCE: 1 Metal, 1 Worker.
- TRADE: 2 Oil. UPGRADE: Move / Deploy.
- BOLSTER: 3 Power. DEPLOY: Underpass Mech on Village.
- PRODUCE: 1 Metal, 2 Workers.
- BOLSTER: 3 Power. DEPLOY: Riverwalk Mech on Village.
- Typically, we might prefer to deploy Disarm before Riverwalk; however, in this game opposing factions were still snug in their base hexes and to reach them, we’d need Riverwalk.
- MOVE: Hero and Mech to combat with Crimea on Crimea Encounter Mountain. Mech from Mountain to Village – pick up 1 worker and go to Tunnel Farm [Combat Star].
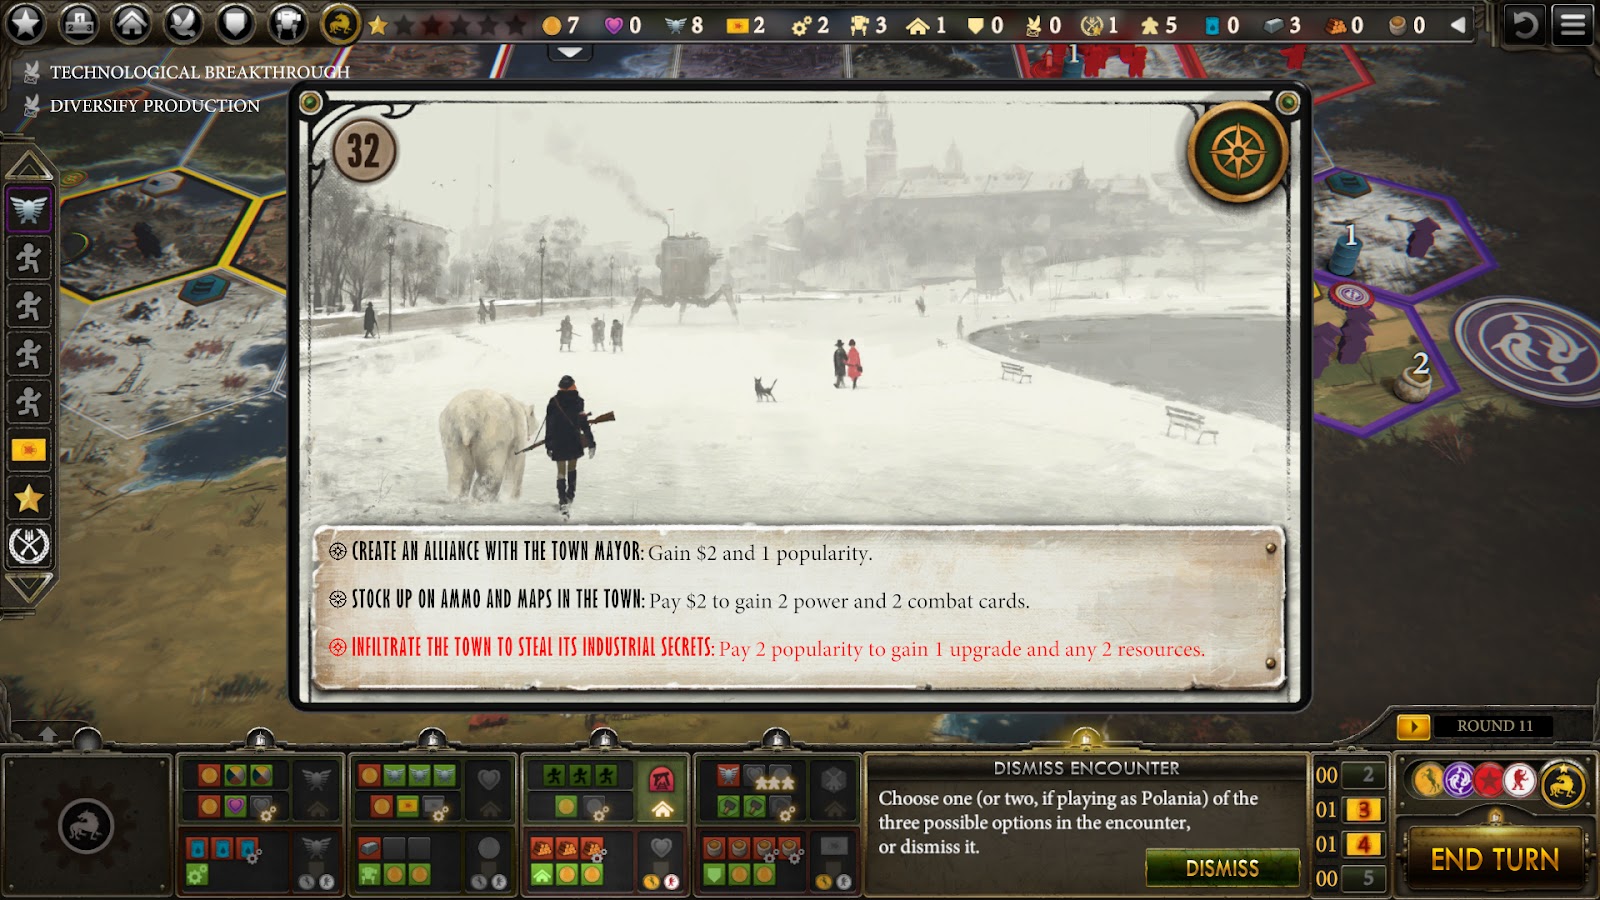
- Encounter: We would benefit greatly from an Enlist, but would settle for some Power or Combat Cards.
- We received Encounter 32, which is almost exactly what we wanted. We paid $2 for 2 Power and 2 Combat Cards
- In our combat, Crimea had workers that had produced 3 Metal on their Mountain, so as an added bonus to this move action, we no longer need workers on Mountains to produce for our final mech.
- BOLSTER: 3 Power. DEPLOY: Disarm Mech on Tunnel Farm. [Mech Star].
- MOVE: Mech + Mountain worker to Village then Mech to combat with Crimea on S. Tunnel Tundra, Mech on Crimea Mountain to combat on S. Tunnel Tundra, and Hero to Nordic Mountain Encounter. [Combat Star] [Power Star].
- Had it been possible to get our Hero to the Factory, we would’ve done that for the option of having a Factory Card. But we didn’t have enough move to get there, so we opted to make use of our Hero getting an additional Encounter.
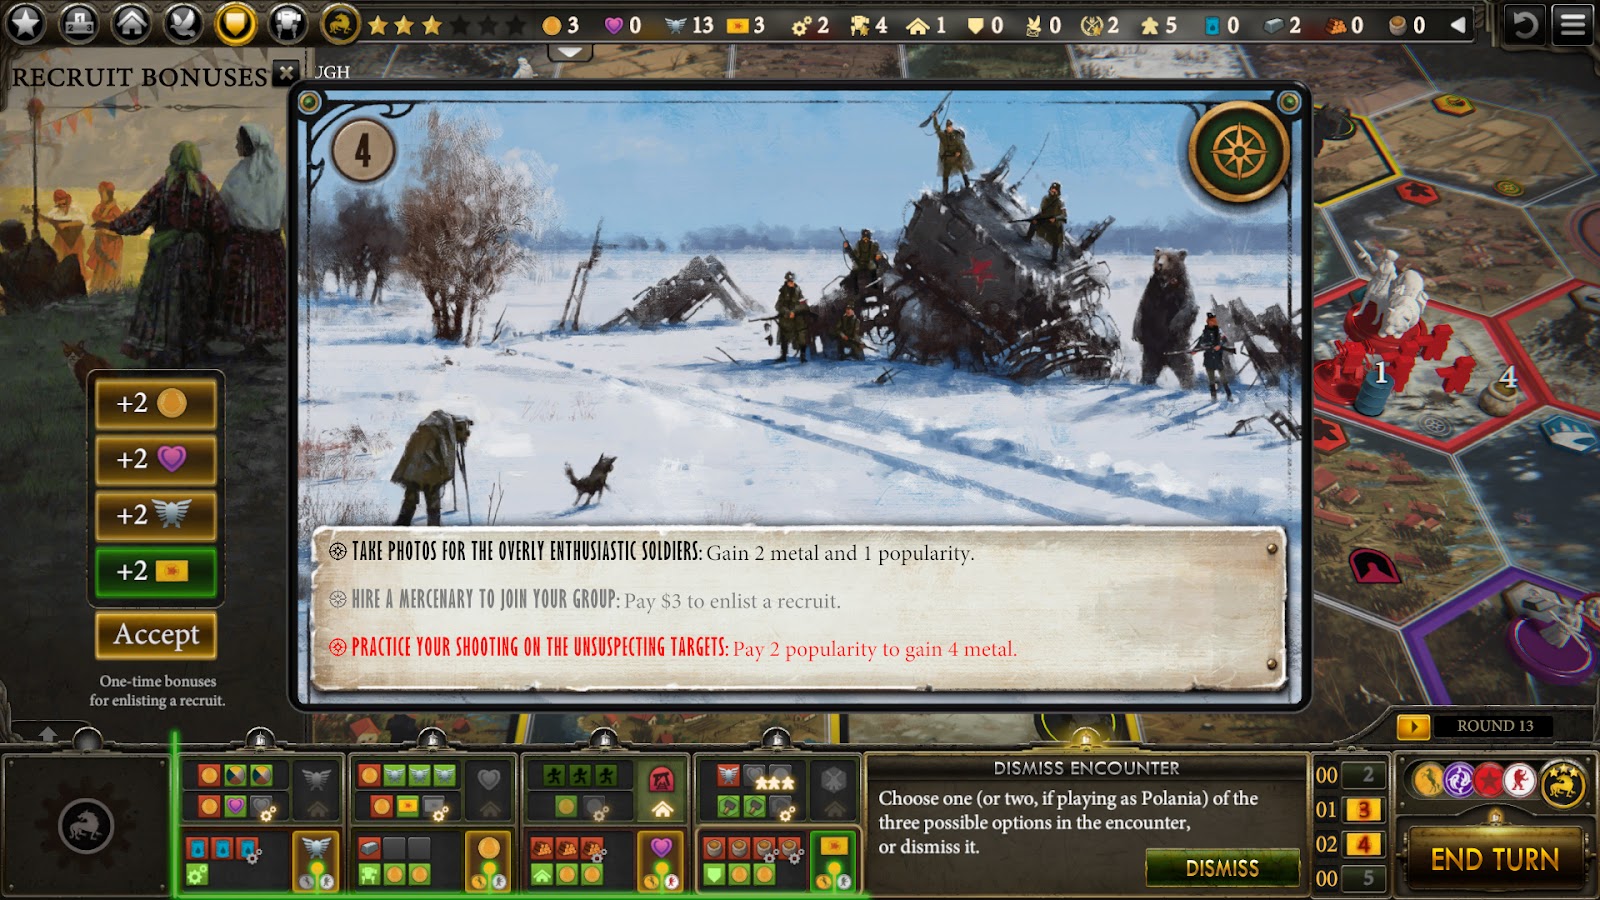
- Encounter: This far into the game, we want to get our Stars. Anything that moves the game closer to that is good for us.
- We received Encounter 4, which inadvertently helps. We pay $3 to Enlist a recruit, and because we haven’t gotten the +2 Power reward from Enlisting, we achieve our Power Star. Combat Cards bonus, Power reward.
- PRODUCE: 1 Food, 3 Workers [Worker Star].
- MOVE: Mechs and workers about the board, to the Factory, and Mech to combat with Polania on Tunnel Mountain. [Combat Star].

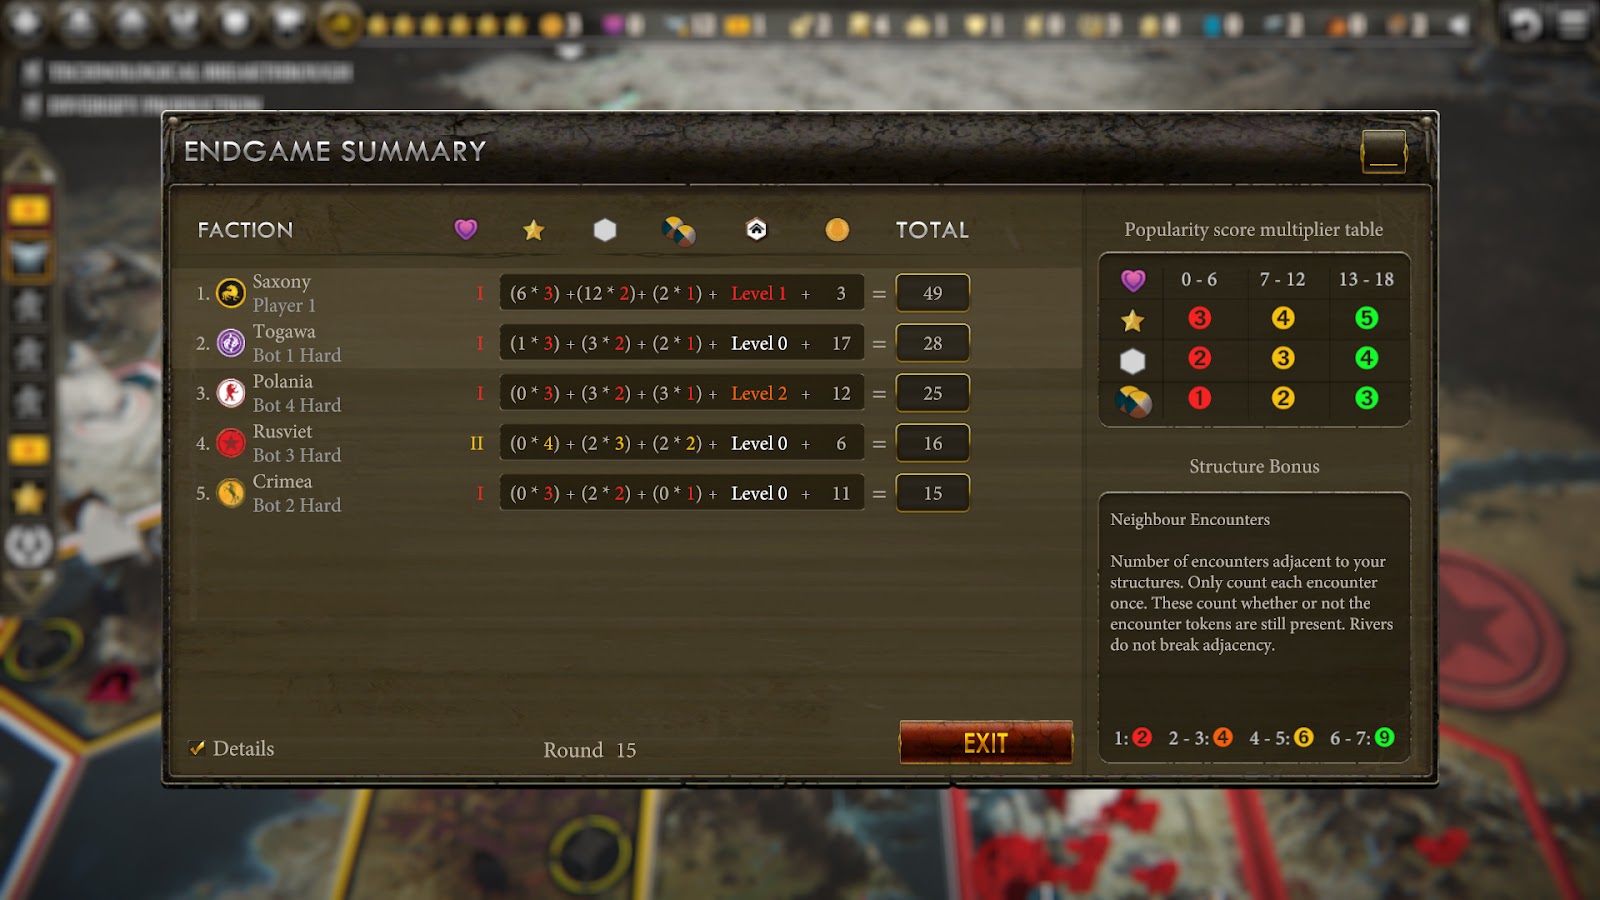
END GAME STATS
- Stars (6): Power, Mech, Combat (3), Worker.
- Round 15; 49 coins.
Thoughts.
An early Encounter that went our way as well as the lack of too many opposing factions outside of their base territories helped to make this playthrough take off from the early game. We had to adapt our mech deployment order to deal with the bots hiding out in their bases, but if those combats had proved too difficult we would’ve probably charged in to intentionally lose some fights to weaken our opponents. One of the brilliant advantages of Saxony is the limitless Combat Stars, which forces opposing players we keep getting into combat with to have to put up some semblance of defense or else continue to give us Stars.
Tips.
With Saxony’s heavy reliance on combats, don’t burn through power and combat cards aimlessly. To keep this strategy streamlined, we need to accept we will only have a very limited supply of power and combat cards to use. So look for easy fights, and team up your mechs as often as possible.
Use your mech abilities to their fullest. Underpass and Disarm are Saxony’s unique abilities and they are powerful when utilized. With Disarm, all fights on Tunnels are to your advantage, so lure your opponents in or seek the ones camping on Tunnels for fights that will swing quickly in your favor.
Also, don’t be afraid to lose fights. With Speed and Underpass unlocked, your units can go from being out of play to getting anywhere on the map with a tunnel, getting you right back into the fight with an opponent who might have spent a great deal of Power and Combat cards to beat you before.
Saxony Mechanical Step by Step Strategy (Game Two).
I thought the first playthrough was a bit of a lark, so I opted to play another round with the same combo and see if there were any differences. I ended up getting much more attainable objectives and thus had a bit of a different game.
OBJECTIVES: Foundations of the Empire, King of the Hill.
- PRODUCE: 1 Metal, 1 Oil.
- TRADE: 2 Oil. UPGRADE: Bolster / Deploy.
- PRODUCE: 1 Metal, 1 Oil.
- BOLSTER: 3 Power. DEPLOY: Speed Mech on Mountain.
- MOVE: Hero and Tundra worker to Village Encounter.
- Encounter: We want Enlists, Upgrades, Mechs, or even the ability to build a Mine on the Village. If not those, resources enough to complete a bottom row action.
- We received Encounter 32 and paid 2 Popularity for an upgrade and 2 resources (of which we chose Metal). This is a great boost as it takes an entire turn away from having to Trade / Upgrade and negates the production to get Metal for our Deploy(s).

- BOLSTER: 3 Power. DEPLOY: Underpass Mech on Village.
- PRODUCE: 1 Metal, 1 Worker.
- BOLSTER: 3 Power. DEPLOY: Riverwalk Mech on Mountain.
- MOVE: Mech + Mountain worker to Factory Mountain, worker to Factory, Hero to combat with Albion on Tunnel Mountain. [Combat Star] [Objective Star].
- Yes, only a single worker for the Factory. We had “King of the Hill” as an objective and all you need is to control the Factory with a unit and have the most – or tied for the most – Power.
- In the combat, we had to ensure we reserved enough Power to be able to complete our objective. If we had forgotten to calculate that, all wouldn’t have been lost, we’d just have to keep a unit on the Factory until we could end a turn with the most Power.
- BOLSTER: 3 Power. DEPLOY: Disarm Mech on Factory. [Mech Star].
- PRODUCE: 2 Workers.
- MOVE: Mech + 1 worker from Village – drop worker on Saxony Forest – mech to Tunnel Farm, Mountain mech to combat with Albion on Albion Tundra, Factory Mountain mech to combat with Albion. [Combat Star].
- As a bonus, we gained 4 Food from combat after chasing Albion’s 4 workers away.
- PRODUCE: 3 Workers, 1 Lumber. ENLIST: Combat Card bonus and Coin reward. [Worker Star] [Objective Star].
- “Foundations of the Empire” as an objective is sort of like getting two Stars for getting your Worker Star, and I like to make them work hand in hand.
- Having our produce action get our Worker Star as the final turn to win is sometimes risky, as it means we’re foregoing the potential territories those workers could occupy. But in this case, we were far enough ahead not to have to worry about accidentally coming in second place.
END GAME STATS
- Stars (6): Mech, Objective (2), Combat (2), Worker.
- Round 13; 48 coins.

Thoughts.
This game went about as smooth as any game could go, and it shows a great deal of how powerful Saxony’s “Dominate” ability is. With two objectives that were possible to achieve, all we had to do was plan our actions to benefit us until the time was right to get those objectives complete.
In comparison to the first game, I hope this playthrough shows how flexible we have to be as players to read the map and other factions and stay aware of all opportunities. In the first game, we got 3 Encounters and this game only 1, and in this game we finished the game in two less rounds with only 1 coin difference in score.
As always, I will never stop harping on how playing against even the hardest AI in Scythe is nothing compared to real players. The Bots can make some parts of playing tough, but in the end they do very odd things that make them more of a minor obstacle compared to actual opponents. Real players, even inexperienced ones, will change tactics quickly based on how many Stars opponents have, or retaliate after a lost combat to retrieve resources, and they take every advantage for themselves that they possibly can get.
Of course that doesn’t mean that the Saxony Mechanical combo can’t win short games in competitive Scythe games; it can, and it does because it’s a very strong combination of faction and mat. What I am saying is real players will see what’s happening and plan on ways to stop the smooth going 13 round win for you if they can.
Tips.
Objectives were the shining moment of this second playthrough. So, consider your objectives and think about when and how you might be able to pull them off early on so that you aren’t preventing yourself from making the most of the opportunity to complete them when it arrives.

Additionally, check out this video of Saxony Mechanical by high ranked Scythe Digital Edition player and content creator FOMOF:
I hope you enjoyed this strategy read through for Saxony Mechanical. Scythe is an amazingly fun boardgame, and the more you learn the more you can enjoy all the nuances. I would love to hear any successful strategies with this combo that you’ve had as well as any thoughts and critiques on this one.
For more overview, check out our Saxony Guide or our additional Saxony Strategies.
Happy Gaming!
- Norman
2 comments on “Saxony Mechanical Strategy”
A
November 10, 2020 at 3:15 amYou never upgraded the trade option.
So how are you getting 2 resources from the Trade action every time?
I am new to the game. Am I missing something here?
TheDailyScythe
November 15, 2020 at 12:06 amHey! Thanks for asking.
The Trade action itself isn’t upgradable. It’s always two resources for one coin.
– Norman