
Whoa! This Saxony Industrial Strategy by guest writer Norman is sick! Get out your pencils boys and girls, Norman is taking you to school.
Scythe Board Game Overview and Introduction.
Start with 1 Power and 4 Combat Cards as Saxony. 4 Coins and 2 Popularity as Industrial.
Industrial Mat
Before starting, it’s important we have a semblance of an idea of what our Mat’s strengths and weaknesses are. Taking a considering look will help us flesh out some strategy for our game and subsequent actions:
First Row, Bolster / Upgrade (3 Oil) + $3.
- This is our big money maker with a potential net of $12 if we go for our Upgrade Star; speaking of which, we have a very real possibility of getting two Stars in this row alone – Power and Upgrades – which in itself is quite powerful.
- We also notice that in a single upgrade, our Bolster is maxed at 3 power and our Upgrade will be discounted to 2 oil.
- Lastly, because Saxony has a Tundra in it’s home base, we have the possibility to start working on this immediately, and can milk it to our benefit throughout a game to help us for combat.
Second Row; Produce / Deploy (3 Metal) + $2.
- This is another strong row in the hands of Saxony and we gain $2 for each Deploy. This is encouraging because Saxony thrives with getting mechs out, and going for a Mech Star is optimal. With this setup we net $8 over the four deploys it takes to get our Mech Star.
- We can also discount our Deploy action down to only one metal after two upgrades giving us a lot of flexibility with our other workers.
- Saxony starts with a Mountain in their base, so from our first turns getting a mech out is very obtainable.
Third Row: Move / Build (3 Lumber) + $1.
- We know that moving is a guarantee in Scythe, and having this top and bottom row combo has some ups and downs:
- Upside; the Build action is typically tough as there can only ever be one structure on any given hex; however, having the Build action after a move is helpful because we can always reposition our workers to open hexes before the structure goes up saving us potential turns. We can also discount the lumber for this action down to 2, which means we can build quicker or even trade for those resources.
- Downside; we have a few steps to take before we can access lumber on produce actions, and any upgrade to discount our Build action takes away a turn of upgrading our more powerful and profitable actions.
Fourth Row: Trade / Enlist (4 Food).
- Sadly this row is our toughest – I say sadly because Enlists are very helpful and powerful. Here we also get no coin and actually lose $1 each time due to Trade or Popularity Boost (though, both can be worth it).
- Upside; we can upgrade twice to discount our Enlists down to 2 food which would make our trade / enlist action seamless for trading 2 food and Enlisting.
- Downside; Saxony has no easy access to a Farm hex which means we’re either trading a lot to Enlist early game, or we’re waiting until midgame before we can get to a Farm. For trading purposes, we’d be using two upgrade turns that could be used for more powerful uses on more profitable rows.
Strategy
Now that we’ve put in our due diligence with taking inventory of what our strengths and weaknesses are, let’s discuss our strategy. Keeping in mind, all strategy needs some room for flexibility in this game.
First, the Stars we’re most likely to get are important to see before the game begins. We always want to maximize our Stars, and potentially control when the game ends to our benefit. Thanks to Saxony’s Faction Ability “Dominate” we have a ton of flexibility to fill in the gaps of missing Stars with an additional objective and additional combats. That in mind, getting a Mech Star will likely happen without trying very hard since we need mechs for combat, Deploy is below our Produce action, and we can discount mechs down to one metal with upgrades on the Industrial Mat.
Since we’ll be producing at least four (but probably more) times to Deploy our mechs, we should figure out what other resources we want to complete other Stars. Since upgrades give us the most coin and we can Bolster on the same action, Power and Upgrade Stars are tempting to aim for. However; due to the combative needs of Saxony, Power likely will be in short supply for a Star. Also, it takes six upgrades to get the Upgrade Star – which means we’d likely have to spend additional turns to get there through moving workers and trading until we can produce enough. So, it would seem Power and Upgrade Stars might not be as likely, though not totally off the table.
Getting 8 workers is possible with 4+ produces, so we can keep that as a likely possibility for the Worker Star.
Unfortunately, getting lumber and food for the Build and Enlist Stars will be pretty tough. A lot of movement, producing workers, and deploying mechs have to happen before we even have a legitimate shot at crossing the river to Forest and Farm hexes with the ability to make that work in our favor. So, unless some amazing Encounters come up, those are likely off the table.
With all that planning, it would look like the Stars we want to aim for are: Mech, Objective(s), Combat(s), and Worker. Somewhat narrower than we’d like, but we have the fallback potential of Power and Upgrade Stars in the event the game takes some detours from our plans.
Objectives
Let’s also look at our objectives before we start. Something a lot of players mistakenly do is disregard their objectives as far more optional than they should. With Saxony, you can get a Star per objective – meaning two potential Stars. So objectives aren’t something we should disregard at all. As we look at them we need to ask:
- Is it possible to accomplish these during normal turns, or do we need to do something special? E.G. take additional move actions to occupy certain hexes.
- With our mat, is it likely we’ll be able to accomplish these without derailing our end game? E.G. trying to build structures when it takes half the game to even acquire the workers and hexes to do such.
It’s always best to have a semblance of a plan in mind with objectives. It’s easier to decide not to get objectives mid game than it is to realize we’re short on Stars and have to rush around the board to complete an objective.
Objective Example.
In one of my games I got the objectives “Harvest Advantage” which states at the end of my turn, I must occupy and control three farm territories. I also had “Stockpile for the Winter” which states I must control a territory with at least nine resources (one of each type) at the end of my turn. “Harvest Advantage” is very flexible and at any point in the game I might be able to fulfill that with ease during my normal move actions. Stockpile for the Winter” however, not so much. To complete it I would have to move workers to produce, trade, and hoard resources; and worst of all, the resources have to be on a single hex.
So, in this game, knowing we’re planning on limited production and a focus on combat, I immediately opted out of “Stockpile for the Winter” and realized I would likely need an additional combat to make up for it.
Saxony Industrial Strategies
Saxony Industrial has some options for strategy, and many I may not have even considered that could potentially be better. The two I’m going to focus on follow in line with our above analysis of the faction, mat, and what Stars we want to aim for. The first builds a lot more on economy, while the second is a full on rush assault on other factions.
Saxony Industrial Strategy Step by Step – “Economy”
Okay, we’ve made it to the actual gameplay, thanks for your patience. As we begin, we want to think of a solid first couple turns to get our process going. I chose to Trade turn 1, Produce turn 2, and Bolster turn 3 as it’s the fastest way to get to our upgrades going which help us quite a great deal toward accomplishing our endgame.
OBJECTIVES: Stockpile for the Winter, Harvest Advantage.
- TRADE: 2 Oil.
- PRODUCE: 1 Metal, 1 Oil.
- BOLSTER: 2 Power. UPGRADE: Bolster / Upgrade.
- TRADE: 1 Metal, 1 Oil.
- PRODUCE: 1 Metal, 1 Oil. DEPLOY: Speed Mech.
- BOLSTER: 3 Power. UPGRADE: Move / Deploy.
- TRADE: 1 Metal, 1 Oil.
- PRODUCE: 1 Metal, 1 Oil. DEPLOY: Underpass Mech.
- BOLSTER: 3 Power. UPGRADE: Combat Card / Deploy.
- MOVE: Hero and Tundra worker to Village Encounter, possible combat for mech.
- I opted out of moving my mech this action because all that was available was a potential combat with Togawa on a trapped hex or stealing resources from Nordic workers. With Togawa and their trap tokens, we risk losing Combat Cards , Popularity, and Power – all of which we don’t really want to deal with this early in the game. With Nordic workers; although free resources are nice, losing all our popularity takes away the last choice on our upcoming Encounter card where we likely have an option to pay in popularity for something.
- Encounter: We want something that helps us get a bottom row action without wasting an additional turn. An Enlist or Structure would be best. Metal, Wood, or Oil enough to pay for these would also be good. Otherwise we go for Power and/or Combat Cards. For this combo, it would be ideal to avoid food as we won’t be trading and enlisting and that would add another turn to our gameplan.
- In my playtest, I paid 2 popularity for 3 lumber and 1 worker. This benefits us because we just finished our move action, and our build action is bottom row and it takes 3 lumber to build a structure. I built a Mine on the Village for additional easy access for our Hero to the rest of the board. As well, getting a worker essentially saves us one produce action toward getting our 8 workers, as later on we typically would have to do one additional produce beyond our need for production to get that Worker Star.
NOTE: from here on out the game will have too many variables to consider, so I’m going to highlight what happened in my playthrough.
- PRODUCE: 2 Workers, 1 Metal. DEPLOY: Riverwalk Mech.
- MOVE: Hero to Village Encounter outside of base, two mechs from base Mountain to combat with Albion [Combat Star].
- Encounter: Chose first option (Gain $2 and 1 Popularity). I didn’t have the popularity to spend on the bottom option and the middle one was going to give us a worker, which at this point would start costing us a popularity to produce – which would mean we’d have to spend a turn to get popularity just to do our final produce action.
- PRODUCE: 3 Workers, 1 Metal. DEPLOY: Disarm Mech. [Worker Star] [Mech Star].
- MOVE: Hero to Combat against Crimea on S. Tunnel Tundra, Mechs and workers to Farm hexes for objective (Harvest Advantage). [Combat Star] [Objective Star].
- BOLSTER: Combat Cards.
- MOVE: Hero and Mech to Combat against Crimea, move worker for additional hex. [Combat Star].
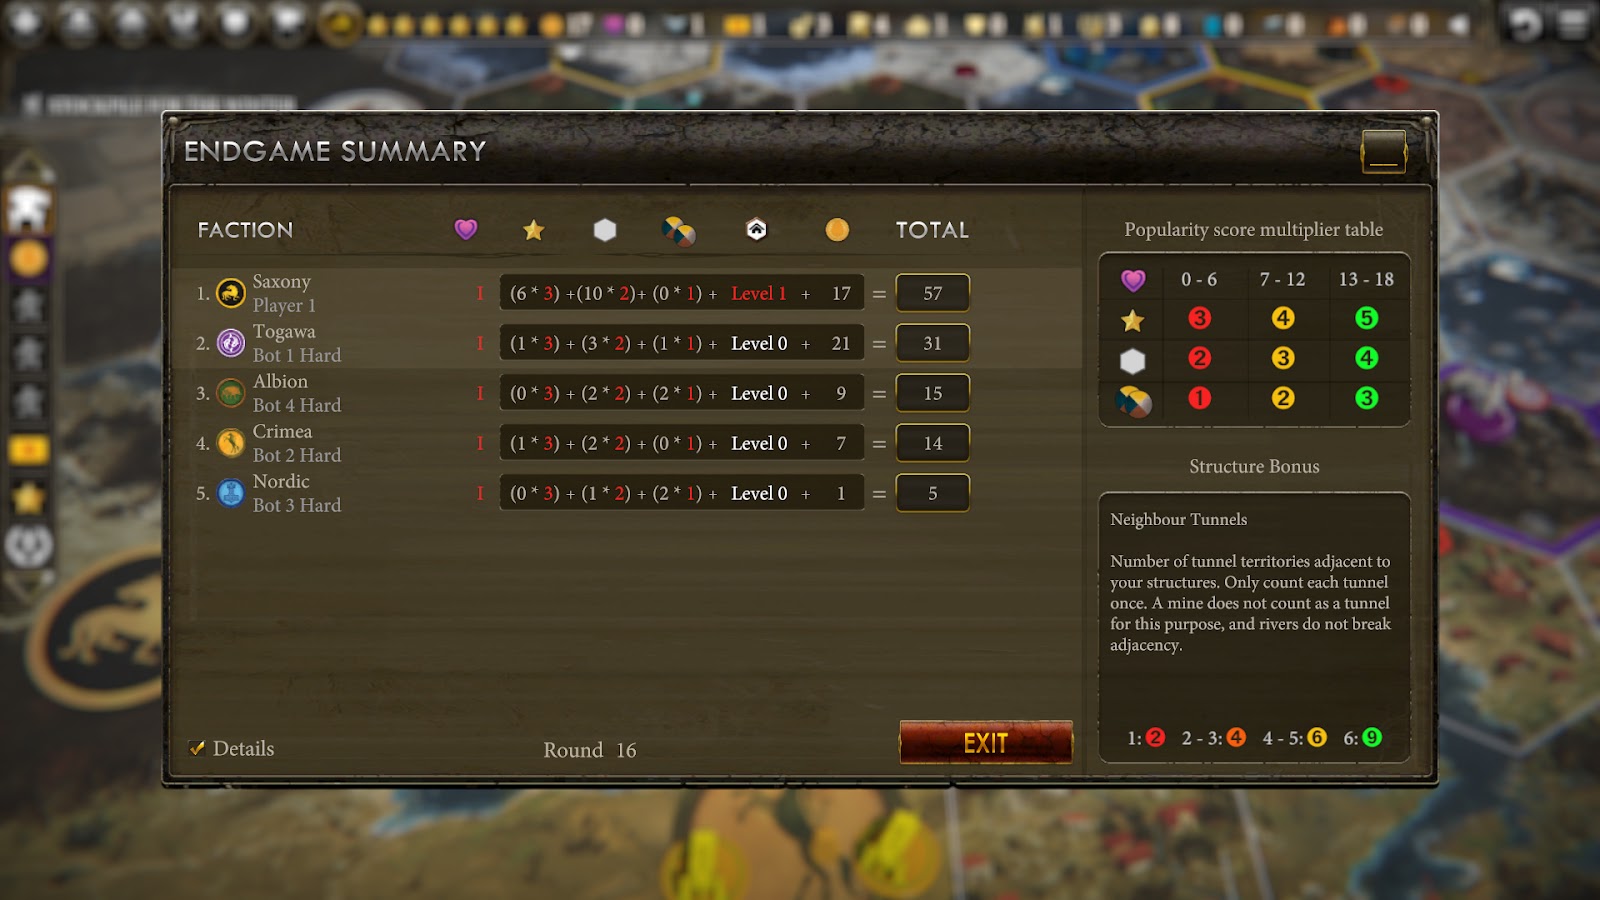
END GAME STATS
- Stars (6): Mech, Objective, Combat (3), Workers.
- Round 16, 57 coins.
Thoughts
One of the biggest struggles I see with this combo and these tactics is the potential to get stuck between late game turns. Almost without exception, these tactics rely totally on getting three combats or getting two objectives complete to get our six stars. The difficulty with that is the limited combat cards and power we have access to. Without easy combats and objectives, I believe this strategy could stall out and force us to take the game into more rounds. Having the fallback option of an Upgrade Star is possible, but we have to allow that will make the game go more turns.
Tips
Since there’s a heavy reliance on combats, don’t burn through your power and combat cards aimlessly. To keep this strategy streamlined to under 20 turns, we need to accept we will only have a very limited supply of power and combat cards to use. So look for easy fights, and team up your mechs as often as possible.
Use your mech abilities to their fullest. Underpass and Disarm are Saxony’s unique abilities and they are powerful when utilized. With Disarm, all fights on Tunnels are to your advantage, so lure your opponents in.
Also, don’t be afraid to lose fights. With Speed and Underpass unlocked, your units can go from bring out of play to getting anywhere on the map with a tunnel.

Saxony Industrial Strategy Step by Step – The “Rush”
Along the same lines as the more economic strategy, we want to focus on the same Stars. However; here we’ll be relying a great deal more on scavenging other factions for resources to accomplish other bottom row actions in between a lot of moving around. The benefit to this strategy can be a faster game, but the drawback is getting stuck between turns if no combats are easily available.
OBJECTIVES: Northern Advantage, Create a Permanent Foothold.
- TRADE: 2 Metal.
- PRODUCE: 1 Metal, 1 Oil. DEPLOY: Speed Mech on Mountain.
- We’ll deploy all our Mechs on the Mountain because once we have Underpass, the Mountain is essentially a Tunnel and will give us immediate access to the map and opposing Faction bases.
- TRADE: 2 Metal.
- PRODUCE: 1 Metal, 1 Oil. DEPLOY: Riverwalk Mech on Mountain.
- TRADE: 2 Metal.
- PRODUCE:1 Metal, 1 Oil. DEPLOY: Underpass Mech on Mountain.
- MOVE: Two Mech rush to Combat or stealing resources. [Combat Star].
- This depends on if there are accessible resources for taking, or easy enough combats to be won. Not an easy task considering we’ll only have 1 power – but with 4 Combat Cards we can send two mechs to gang up on a hex. This serves two purposes; getting to use 2 Combat Cards per combat, and preventing our opponents from coming right back to fight us to gain an easy victory for them.
- In this game, Polania Hero and worker were the easiest targets on their base Forest with 2 oil and 1 lumber. So I gained a Combat Star and those resources.
- BOLSTER: 2 Power. UPGRADE: Move / Upgrade.
NOTE: From here on out, turns depend on what resources we were able to obtain from our rush and forthcoming Encounter. Ideally we want to get bottom row actions done, so we’ll focus on those that we got resources for before reengaging. However; since there are so many variables, I’ll just be listing the turns I had in my playthrough.
- MOVE: Hero to Encounter (Forest, not Village), Mechs retreat to distant Tunnels or press attack and resource stealing.
- We take our Hero to the Forest Encounter first because that hex is out of the way in relation to the rest of the board. However, if we go there first, on our next move we can get right back to the Village Encounter in our base, and have much better move potential from that spot.
- Retreating our mechs isn’t always necessary, but it’s smart if our opponent has the ability to defeat us in combat on successive turns and force us to lose gained resources. In the cases where our opponents are still weaker than us in Power and Combat Cards, pushing another assault on them is also a possibility to get more resources and easy combats.
- In this game, Polania had 4 workers on their Village with 2 Metal. I used one of our mechs to send them home and gain the metal and the other mech to the Tunnel Mountain outside Polania’s base for better positioning. I only split our mechs here because no other faction had the ability to attack us on the Tunnels and Polania had no mechs (Speed most importantly), so they weren’t able to reach our mech in their base.
- On this Encounter, I paid $2 for an Elist choosing Enlist bonus and Combat Cards knowing we’ll be needing those later.
- PRODUCE: 1 Metal, 1 Oil. DEPLOY: Disarm Mech [Mech Star].
- MOVE: Hero to base Village Encounter, worker from Mountain to Village, and Mech in Polania’s base to Mountain Tunnel with our other mech.
- Encounter: I chose to pay $2 for 4 Power.
- Right after my turn, Nordic Kingdom decided to attack our two mechs on the Mountain Tunnel with only one mech of their own. Between using two Combat Cards and six Power, we could’ve won, but I opted to bid no power or Combat Cards. Here’s why:
- We didn’t have any resources on this hex to defend.
- Since this was on a Tunnel, it means we got to use “Disarm,” and our next move action, this mech will still be on this Tunnel to use “Disarm” on again.
- Because this is on a Tunnel, we’ll be able to reach it again on our next move action from the Mountain in Saxony’s base due to “Underpass.”
- After this attack, Nordic Kingdom will be far easier to beat, possibly even free if they spend a lot to win (which they did: 9 Power and a 2 Combat Card).
- BOLSTER: 2 Power. UPGRADE: Bolster / Enlist.
- MOVE: Hero and the two off board mechs to combat with Nordic on Tunnel Mountain [Combat Star]. BUILD: Mill on my base Village.
- Nordic had Bolstered for 3 Power last turn, but with “Disarm” they went down to 1 Power and had no Combat Cards.
- We beat them using 1 Power (wanted to save Combat Cards) as opposed to when they attacked before and it would’ve taken all our 6 Power and two Combat Cards to beat them.
- I moved all three of our units here because I wanted them all further on the board, but wanted to ensure none of them would be easy targets.
- The Nordic mech had 3 lumber with him, so I used it to build at the end of our move action. Since getting workers out faster for the Worker Star is our best bet for keeping the game shorter, I put a mill on the Village we would be producing on.
- PRODUCE: 1 Oil, 2 Workers.
- MOVE: Mechs from base Mountain to Combat with Albion on Albion Tundra, mech from Tunnel Mountain to Tunnel Tundra hex to complete “Northern Advantage” objective. [Combat Star] [Objective Star].
- The map was full of combat options this turn as Rusviet had finally broken out to fight Nordic for the Factory. I had the ability to attack everyone; however, Albion and Nordic were lowest in Power and Combat Cards. I also saw this as my chance to complete one of my objectives, so I opted to fight Albion since they were on a Tundra and then I only needed to acquire one additional Tundra hex with my other mech.
- PRODUCE: 1 Oil, 4 Workers [Worker Star].
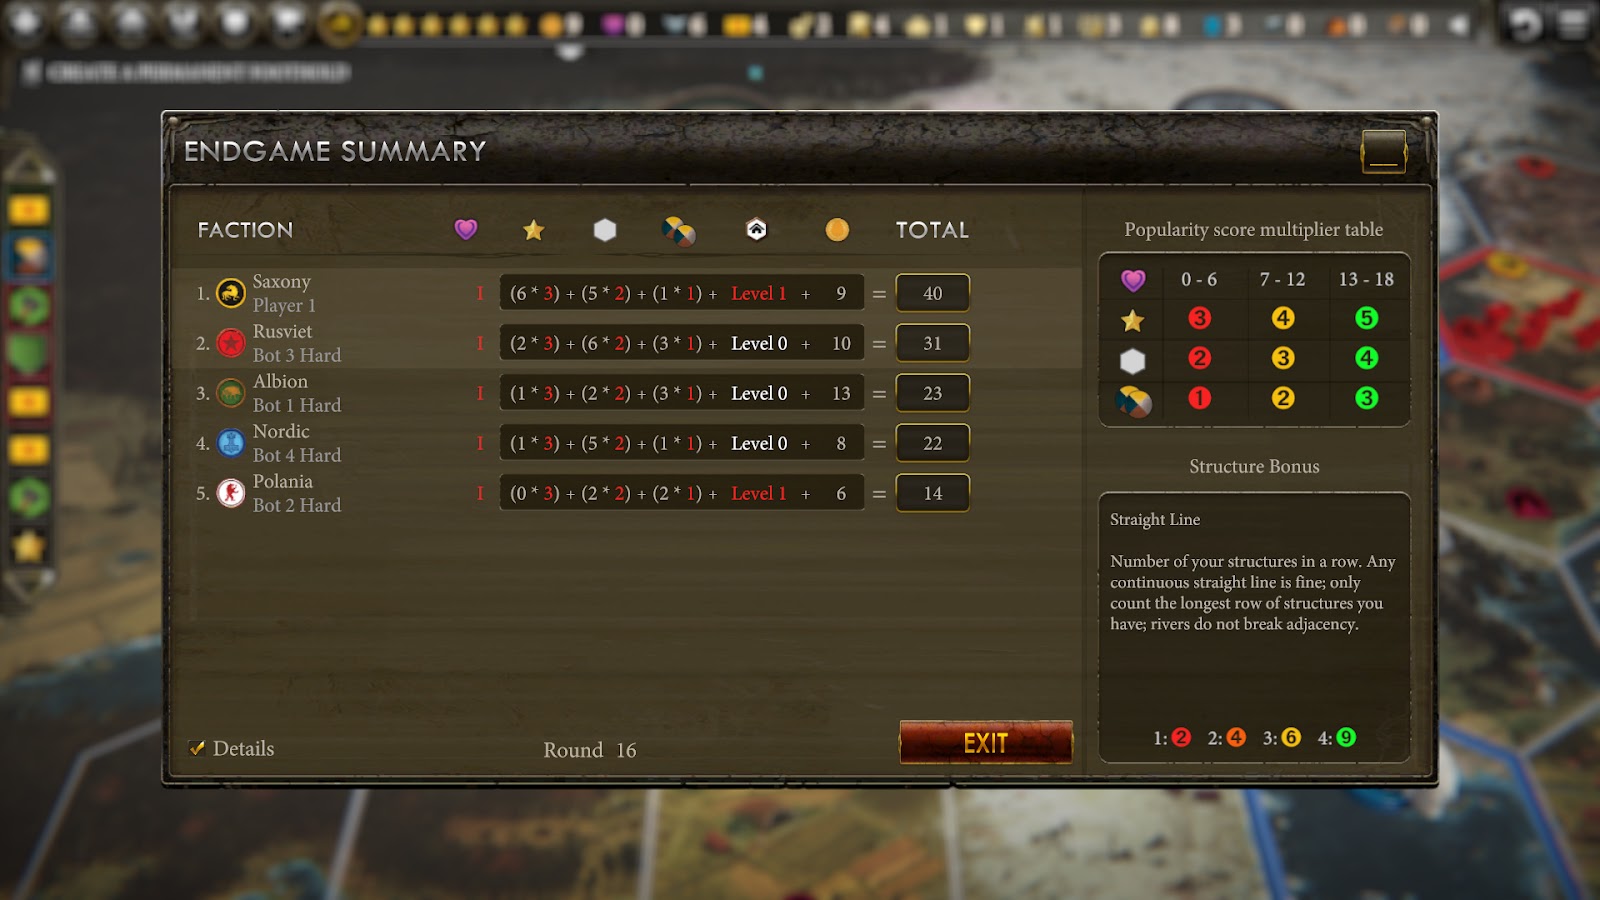
END GAME STATS
- STARS (6): Mech. Objective (1), Combats (3), Worker.
- Round 16, 40 coins.
Thoughts
Even though we won, 40 Coins probably doesn’t seem like much of a victory, especially considering our win was only by 9. The biggest setback to our score is easily the lack of territory we control at game’s end. We only occupied five hexes and three of those had more than one unit – especially our village, which had seven workers and a mill. In a game where another faction was up to Tier 2 Popularity, we likely would’ve been losing to them even with more Stars than them. In such a case, we would’ve wanted to spend another turn or two moving our units about the board, and at that point may have gone for another combat as our final star.
Another detriment to our final score is the nature of the rush itself. We spent eight (half) of our turns trading and moving which for the Industrial Mat aren’t coin generating – in fact we netted negative 4 Coins from those actions. Though we had a couple economy actions like two upgrades and four produce / deploy actions, we also had a couple Encounters that we paid coin to gain the benefits we wanted.
Even against the hardest AI, this is still somewhat easy to manage. As we saw, when Nordic attacked, Bots make some odd decisions. Had this game been against real players, we might have had to put a bit more thought into combats – as likely, somewhat experienced players wouldn’t have left mechs or hero units alone on a hex. To offset this, I tried to play this game like the opposing factions were real players. For example: early on when we rushed Polania’s base for the combat and resources, we could’ve stayed there milking them for easy combats as the AI does very little to tactically rebuff opponents.
As well, this combo can be played even better by more experienced players. Check out Discord tournament winner Joydivision as he plays through on Saxony Industrial:
Tips
Typically, there are a lot of things that need to be in our favor to make it possible to actually win, and not just annoy all the other players until they take turns stomping us into the ground. And obviously, we won’t be winning any popularity contests (all pun intended).
First, we need at least Crimea, Polania, or Nordic Kingdom to be in the game – which is always possible in five player games. This is because with our first three mechs (Speed, Underpass, and Riverwalk) we can gain access to their bases on their Forest and Mountain hexes. Albion and Togawa are potentially accessible, but less so considering their hampered movement and they have to get to Albion’s Tundra or Togawa’s Mountain to engage in our first move action – not impossible, but less likely than the other factions.
Second, to pull off the first rush is easy, but to keep the pressure on and take advantage of successive move actions to steal resources and win combats is difficult. In between our attacks, we need to develop a stream of combat cards and/or power in order to keep it up with any rate of success. This means, we’ll be needing an influx of resources to be able to work other bottom row actions. The only way this happens is if we can steal resources fairly consistently, and get our hero to as many encounters as possible on our move actions (better still, getting our hero to the Factory on our move actions).
Any resources we can steal are solid, and winning a combat on a hex with resources is even better; but ideally we want resources like food and oil that allow our very next action to get us an enlist or an upgrade to keep boosting power and getting us combat cards.
Third, to actually win the game is a challenge. An early rush is typically a surprise to many players, and even if it’s not, they rarely have the ability to avoid it without hiding all their pieces in the corner of their base – which is still good for us because it hampers them for the long haul. However, all this early game subterfuge is going to leave our economy stunted from the lack of doing anything except making mechs. By the time we move on turn seven, we only have three mechs and two workers as our board state, by turn eight we’ll also have an upgrade.
That’s not a great standing for building up our economy. As such, we have to be smart and make the most of our move actions to get workers where they need to be, and make the most of our actions in between our constant assault. To gain more than just a Mech Star and Combat Stars, it also helps a great deal to have an objective, but ideally both objectives that we can manage to pull off.
Again, not impossible, but a lot has to go in our favor and we have to play smart if we hope to win with this strategy.
I hope you enjoyed this strategy read through for Saxony Industrial. I would love to hear any successful strategies with this combo that you’ve had as well as any thoughts and critiques on this one.
Happy Gaming!
- Norman
Well, I learned a lot, and I’m sure you did as well. Make sure Norman knows how awesome he is in the comments below!
If you need more Saxony help check out my general guide here. If you don’t own Scythe I really recommend checking out the digital version, you can find it on steam!
4 comments on “SAXONY INDUSTRIAL STRATEGY”
C Bell
November 18, 2020 at 12:11 amJust 15 rounded on the 4th game of Scythe I’ve ever played. Switch your turn 5 and 6 for an extra resource. Got v lucky worker on encounter so one less produce required and had triple tunnel objective so stars aligned.. but 4th game ever! lol. Thanks, used you first 6 turns and freestyled the rest.
Aristarh
September 2, 2020 at 4:49 amExcellent!
Chris
May 14, 2020 at 2:35 pmWell that may have been the most fun I’ve had playing against the AI yet. I tend towards economical-turtle strategy, but after reading through this I decided to give the Rush a try with 4 medium bots.
The early game trade-produce strategy is very neat, definitely committed to having no real production of your own in the mid and end-game, which made me nervous, but it ended up being huge fun ripping resources from the other factions.
I deviated after round 6, as my opportunities unfolded very differently from Norman’s. There were no targets with enough resources to be tempting in the first wave of attack, so I sat back and did Bolster/Upgrade, with improvements to Move and Upgrade.
The next round (7) was like my birthday. Nordic had two tiles of undefended workers with 3 wood and 3 food between them. So Move/Build without expending power or cards, or earning Stars (RIP Popularity though). Built Monument on my mountain. Character went to the forest encounter nearest base, paid coin for metal.
Next (8) Trade/Enlist, picked the enlist alongside Upgrade, taking two CC. This gave the Bolster/Upgrade column the Monument and Enlist bonuses. Then (9) cranked out final mech, and (10) Bolster/Upgrade.
From there on it was just bouncing back and forth between Move/Build and Bolster/Upgrade. Targeting wood and oil. Every Move was a ranked choice.
A.) Mech with worker to next build location (since I’m moving so much, may as well get the structure bonus)
B.) Mech to steal wood/oil. (I should say all other factions were very weak except Crimea whom I avoided until the final round, so I never needed two mechs in a battle.)
C.) Character to encounter.
I think I only had to miss one build opportunity due to lack of resources.
Picked up 6th Star on Round 20 with for overall 62 score (next was Rusviet at 42).
Breakdown was: Pop: Lvl 1, Stars: 6, Hex: 8, Res: 6, Lvl 3 Structure Bonus, and Coin: 16
Stars were earned for: Mechs, Max Power, and Battle. Had 1 structure and 1 upgrade remaining, but opted to spend the last round taking land & resources for a quick boost to final score.
Thanks! Love the site! Has really given me a deeper appreciation for the game.
TheDailyScythe
May 22, 2020 at 7:47 pmThanks for the feedback Chris!
Yes, specifically on this combo, after the first Encounter and moving out of the base hexes, any set plans get thrown to the wind. But it seems like you took it in stride. I have to agree that ripping into other factions as Saxony is quite satisfying, especially when you can augment that move action with a structure build and getting some decent resources. Most of all, glad it was fun!
We appreciate the compliments, and we’ll be continuing to bring you more strategies and insights into Scythe, as it happens to be one of our favorite games.
– Norman