
Coming in hot with the Mean Green Phalanx Machine, starring Albion Militant. As fate would have it, this seems to be our first Albion Step by Step Strategy for the site! Queue the fanfare!

Of course, that’s not without reason. Most of the strongest strategies in Scythe revolve around the original five factions; and those of course, predominated by Rusviet and Crimea. Everyone wants Rusviet and Crimea strategies! But we’re going to start breaking rank and try to open up the gates for some good games for all factions.
Getting to this strategy took me a great deal of work because I don’t usually choose to play Albion; and like most players, I find the IFA (Invaders from Afar) factions fairly unappealing based on purely superficial observations and their apparent lack of overwhelming board domination. Of course, the longer you play, the more you can come to appreciate the IFA factions and what they’re capable of doing, and in my process of playing this combination, I was actually blown away by how efficient Albion can actually be.
Originally, I kept hitting Turn 19 before I could nail down my 6th Star, and in my frustration, I started combing through and messing with other possibilities in the early game to help us get a jump. I finally stumbled into a sequence that helps protect us in the early game, and reliably can finish by Turn 17 or can have the flexibility to run up the score in prolonged games. I decided that was a win and with posting.
Militant Mat.
Generally speaking, the Militant Mat is decently strong with most factions. It has a lot of potential to generate a good amount of coins and is solid at getting mechs out. Additionally, it favors Enlisting which is widely considered the strongest bottom row action.

Highpoints:
- We have two pretty strong rows with Move / Deploy and Trade / Enlist – both of which net us some decent coin.
- Albion starts on a Mountain and Farm, which helps a great deal toward our Deploy and Enlist.
Lowpoints:
- Albion thrives on getting an Upgrade, but this combination makes it tough to get one in decent turn sequences without the help of Encounters. So it forces us to take (an) additional turn(s) or forego getting an Upgrade.
- Our Produce action will stand alone the entire game as the bottom row is Build. The cost to Build a structure is a steep 4 Lumber and Albion is nowhere near a Forest.
Star Strategy.
I don’t recommend starting a game without considering what Stars you want to achieve. For those unfamiliar, Stars are Victory Points, and the first player to Six Stars ends the game. So, they’re kind of important.
- Upgrade Star. If we can get an Upgrade or two, that would be great. But getting enough to gain the Upgrade Star isn’t likely considering all we have to focus on. So, no Upgrade Star for us.
- Mech Star. Mechs are our most lucrative coin gain on the Militant Mat and Albion thrives on their mechs, so we’ll definitely have this as a forerunner.
- Build Star. It’s highly unlikely that we’ll be able to Build any structures unless they’re from Encounters. We don’t start near a Forest, nor can we discount the Build costs down enough to make it easy enough for Trades. So, the Build Star is not an option.
- Enlist Star. Albion does well enlisting with this combination. We gain some decent coin and it’s below the Trade action, plus Albion starts on a Farm hex. We’ll definitely want to go for this one.
- Worker Star. In the course of all our necessary Produce actions, it won’t be difficult to gain our eight workers, so we’ll go for this one.
- Objective Star. Objectives are always on the table. Some of them are a bit tougher for Albion to achieve than they are for other factions due to our lack of mobility; however, if possible, we’ll want to get an Objective completed.
- Combat Star(s). Another option that’s always a focal point. With Albion, combats are tougher to wrangle down than most other factions, but we have plans for that. So we’ll be focused on this one.
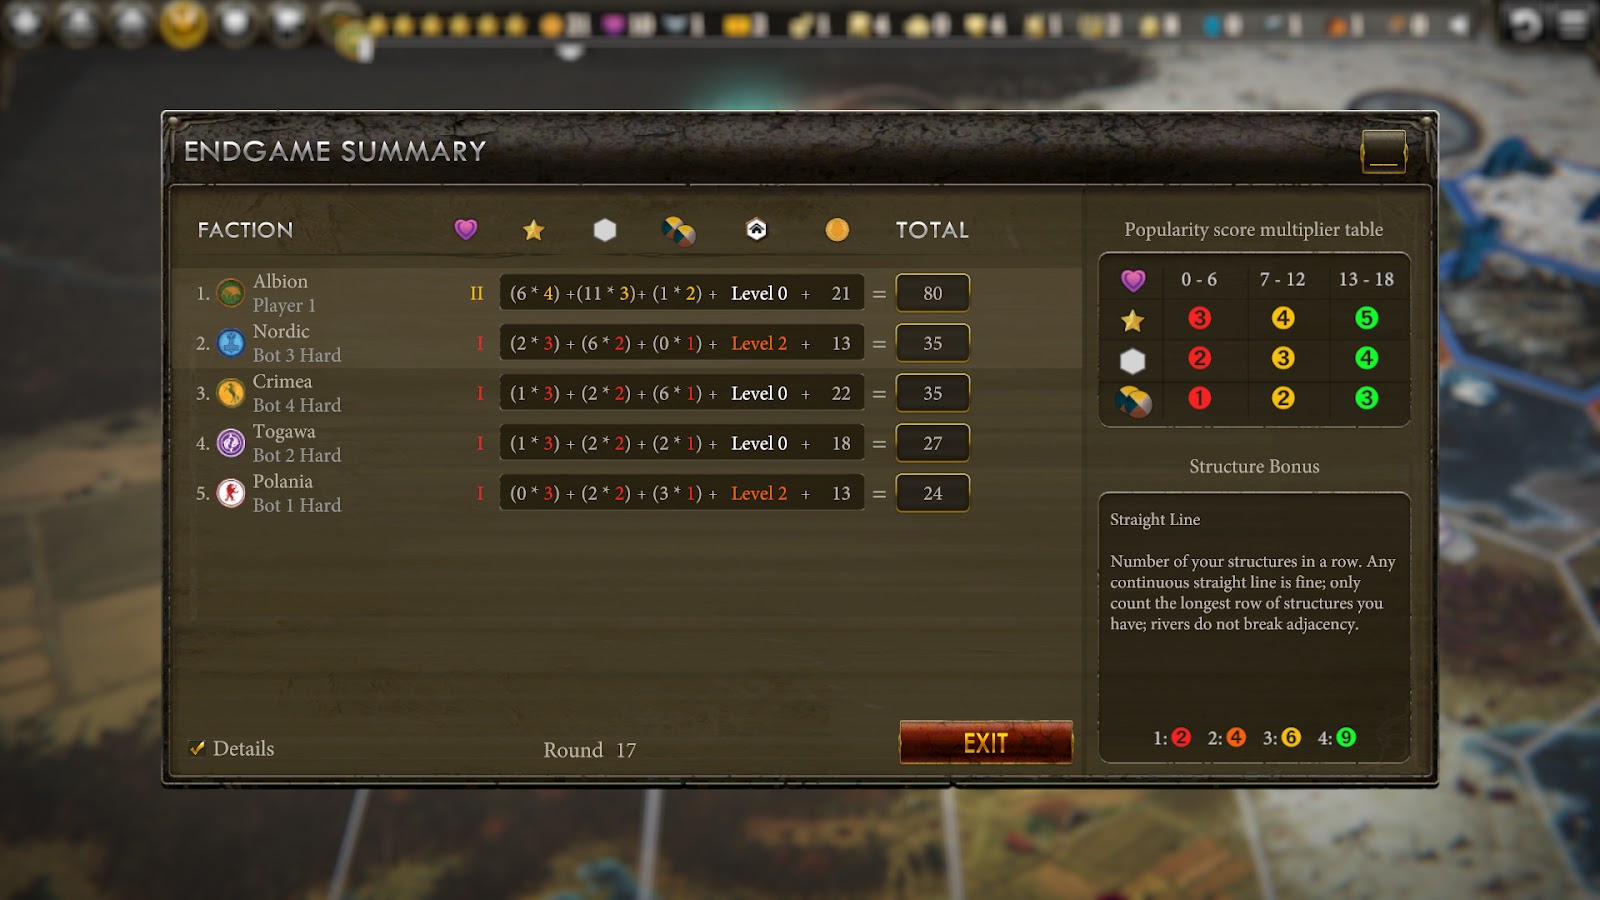
- Popularity Star. Very rarely has Popularity gotten to 18 in competitive games I’ve seen or played in. So, there’s really no point in having it as a focus. But! And this is a very rare and very big BUT – With this combination we’ll be trying for Tier 2 Popularity and in the event we don’t get Objectives we can complete, we’re going to have the Popularity Star as a fallback, or try for it anyway, as increasing our Popularity beyond 13 to Tier 3 may prevent the game from ending before we can get our last Star.
- Power Star. Maxing our Power could be possible if we considered our Bolster / Upgrade row seriously. But, we have much better options and we don’t want to spread ourselves thin by adding in Bolstering to our sequences. No Power Star for us.
For this combination, we’re going to focus on our Mech, Enlist, Worker, Objective, and Combat Stars – and we’ll leave a slightly open door for the Popularity Star if nothing else works out for us.
Objective Strategy.
Getting an Objective for any faction is important, but it’s almost crucial for Albion Militant. Without an Objective Star, we have to rely on stalling the game out while we go for our next possible Star, which likely would have to be Popularity. This of course isn’t ideal, so whatever Objectives we get we’re going to consider thoroughly.
For our first game playthrough, we received “Woodland Advantage” and “Send One Back as a Warning.” And we audibly sigh in relief as both of these Objectives are possible.

Woodland Advantage states “Control at least three forest territories at the end of a turn.” This can be accomplished over the course of several Move actions. A downside to this is we aren’t starting near any Forests; however, there are quite a few accessible nearer to the Factory.
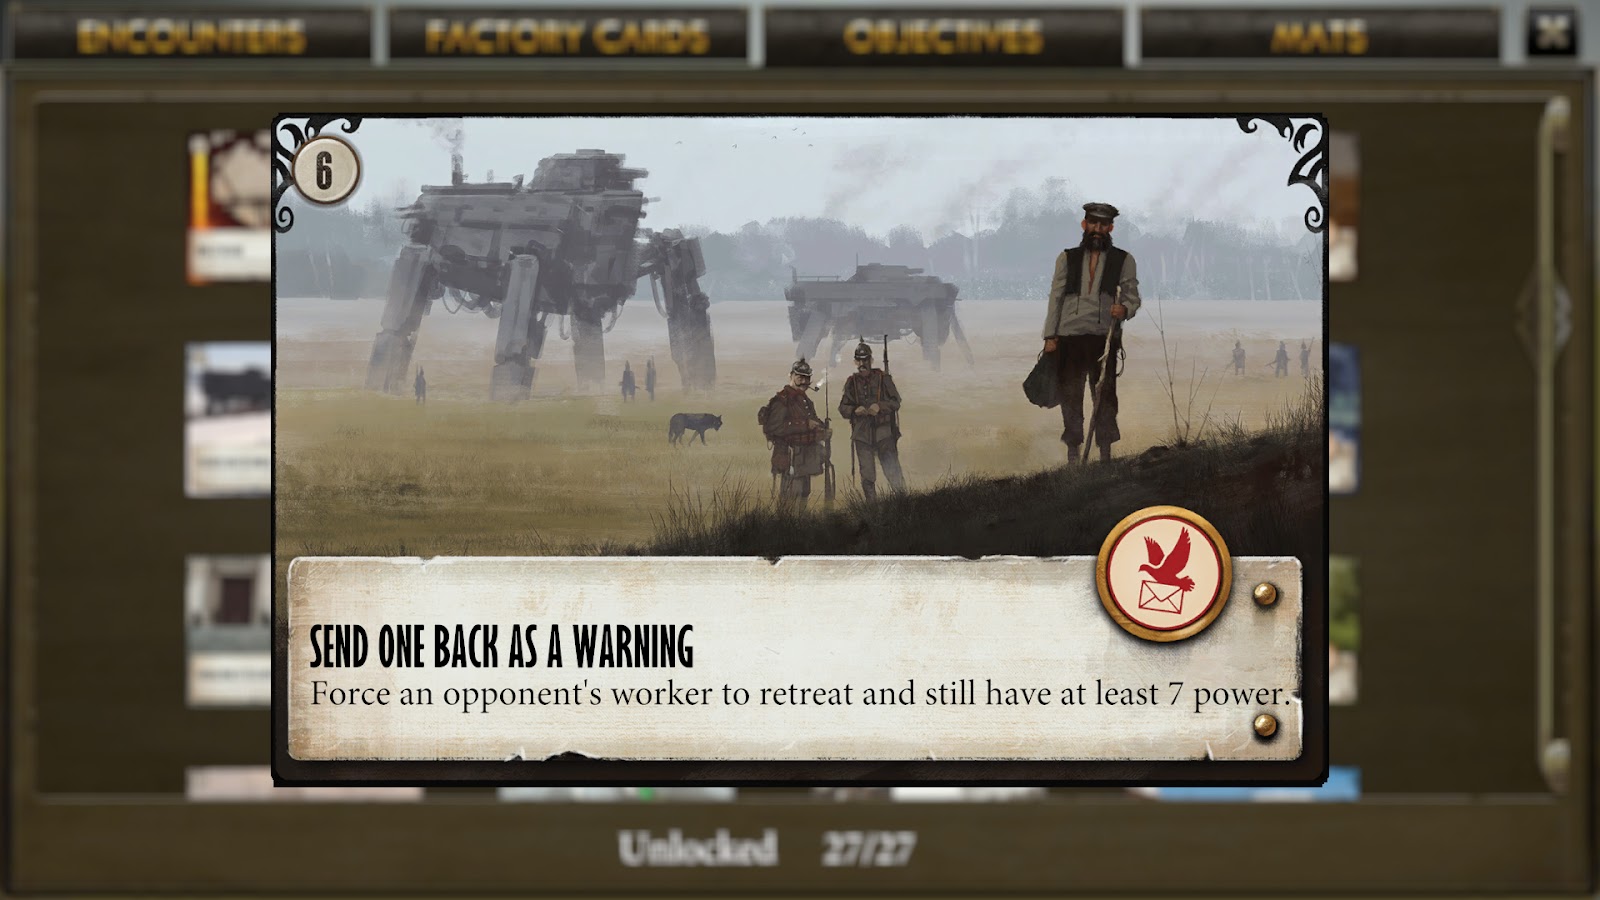
Send One Back as a Warning states “Force an opponent’s worker to retreat and still have 7 Power.” This one is a bit tougher. Thankfully, it doesn’t require combat to happen first, but getting up to 7 Power will be a bit tough, not to mention it will cost us a Popularity to bump an opposing worker – even in combat. All that said, it’s still possible, just not as easy as the first one. So, for Game One, we decided to focus on “Woodland Advantage.”
For our second game playthrough, we got “Machine Over Muscle” and “Population Advantage.”

Machine Over Muscle states “Have one Factory Card, at least one mech, and no more than three workers.” This Objective is tough for us because it requires us to derail our plans in lieu of rushing to the Factory. It’s possible with the Militant Mat to still have a decent game because of the Deploy action under the Move action, but in light of the options, it isn’t the best choice.
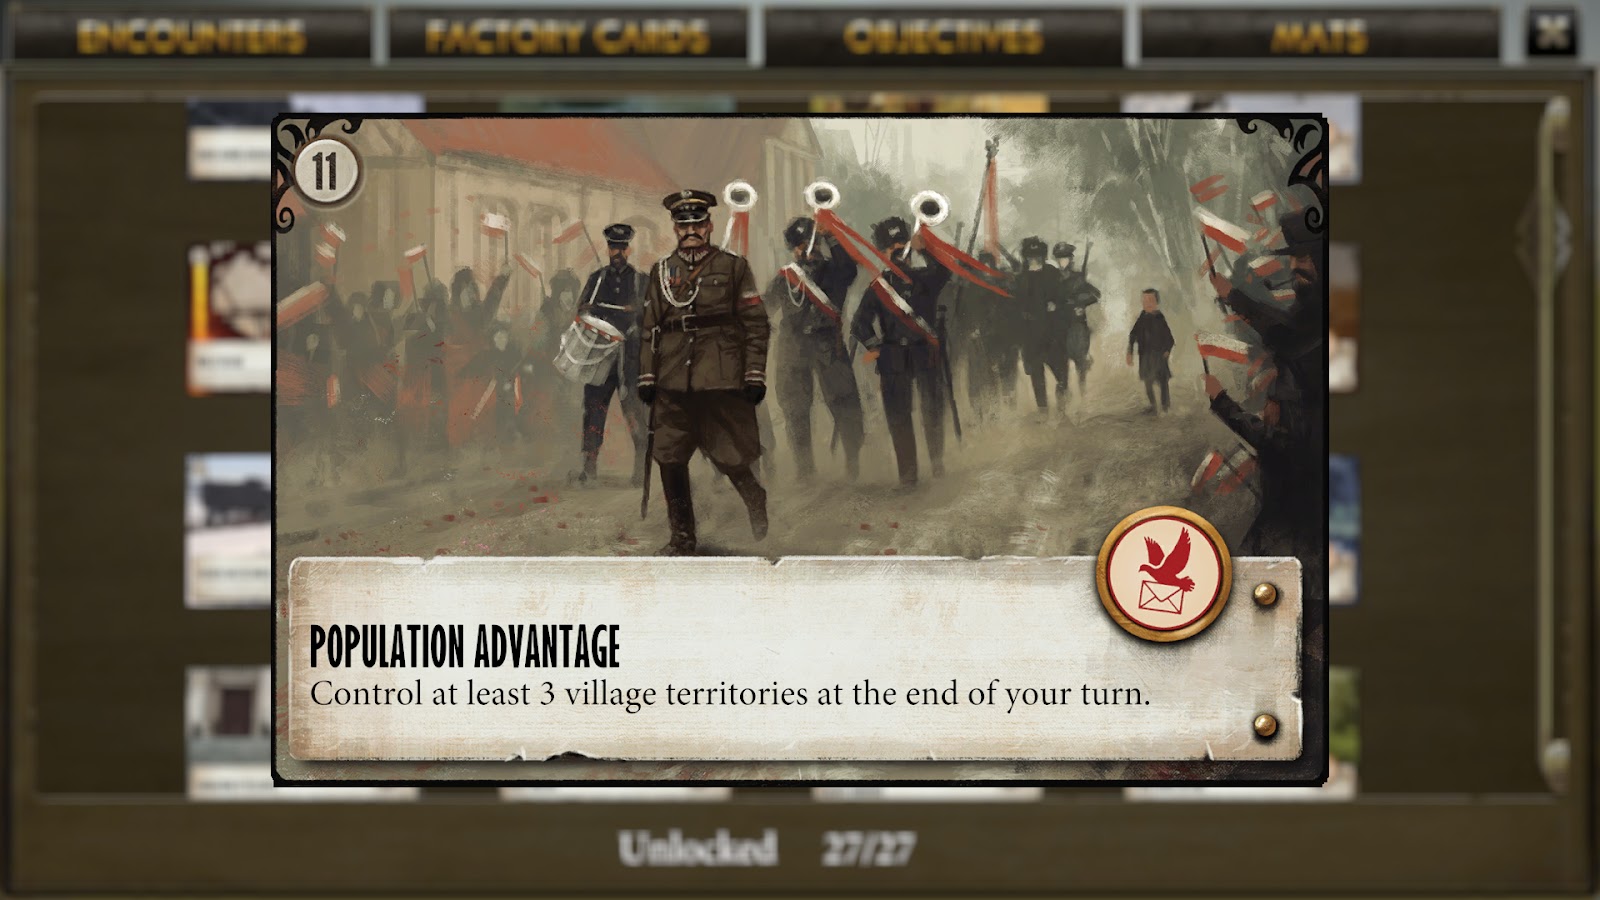
Population Advantage states “Control at least three Village territories at the end of your turn.” Having access to a Village and the ability to gain others during Move actions is not going to be overly difficult, so we’ll be going with this Objective for the second game.
Strategy Overview.
We’re going to be off to a slow start, there’s no getting around that. One of the problems we face as Albion is that other factions see us as an easy target for combats early on, so to help protect ourselves, we’re aiming to get a Turn 3 Enlist and a Turn 4 Mech. Beyond that, we’re just going to hope to churn lots of coin and increase our Popularity if available to keep our score relevant in the game.
We would thrive on one or two upgrades, but because of the Militant Mat setup and the hexes we can reach quickly with a lot of workers, we’re actually going to have to depend on getting Upgrades or Oil from Encounters – otherwise, we’d be splitting our Produce or Trade actions to squeeze getting Oil in, which forces us to use more turns.
Thankfully, in both games our Objectives are obtainable, so as long as combats are close at hand, we can end these games in relatively competitive timing.
Finally, if you are unfamiliar with Albion and the strategies of how to utilize their faction and mech abilities I would recommend checking through our Albion Strategy guide to help out as there are a lot of techniques we’ll be using in these strategy playthroughs.
Step by Step Strategy Game One.
Objectives: Woodland Advantage and Send One Back as a Warning.
- TRADE: 2 Metal.
- PRODUCE: 1 Metal and 1 Food.
- TRADE: 2 Food. ENLIST: Build / Combat Cards Reward.
- Nordic and Polania had Lumber, so we’re planning to capitalize on getting Tier 2 Popularity, otherwise we likely would’ve taken the Deploy Enlist.
- MOVE: Hero to Farm, Worker to Village. DEPLOY: Rally Mech on Village.
- PRODUCE: 1 Worker and 1 Metal.
- TRADE: 2 Metal.
- PRODUCE: 2 Workers and 1 Metal.
- MOVE: Hero to Village Encounter. Mech + 1 Worker to Mountain. DEPLOY: Burrow on Village.
- We Deployed Burrow here to have move movement options in case Polania traps us.
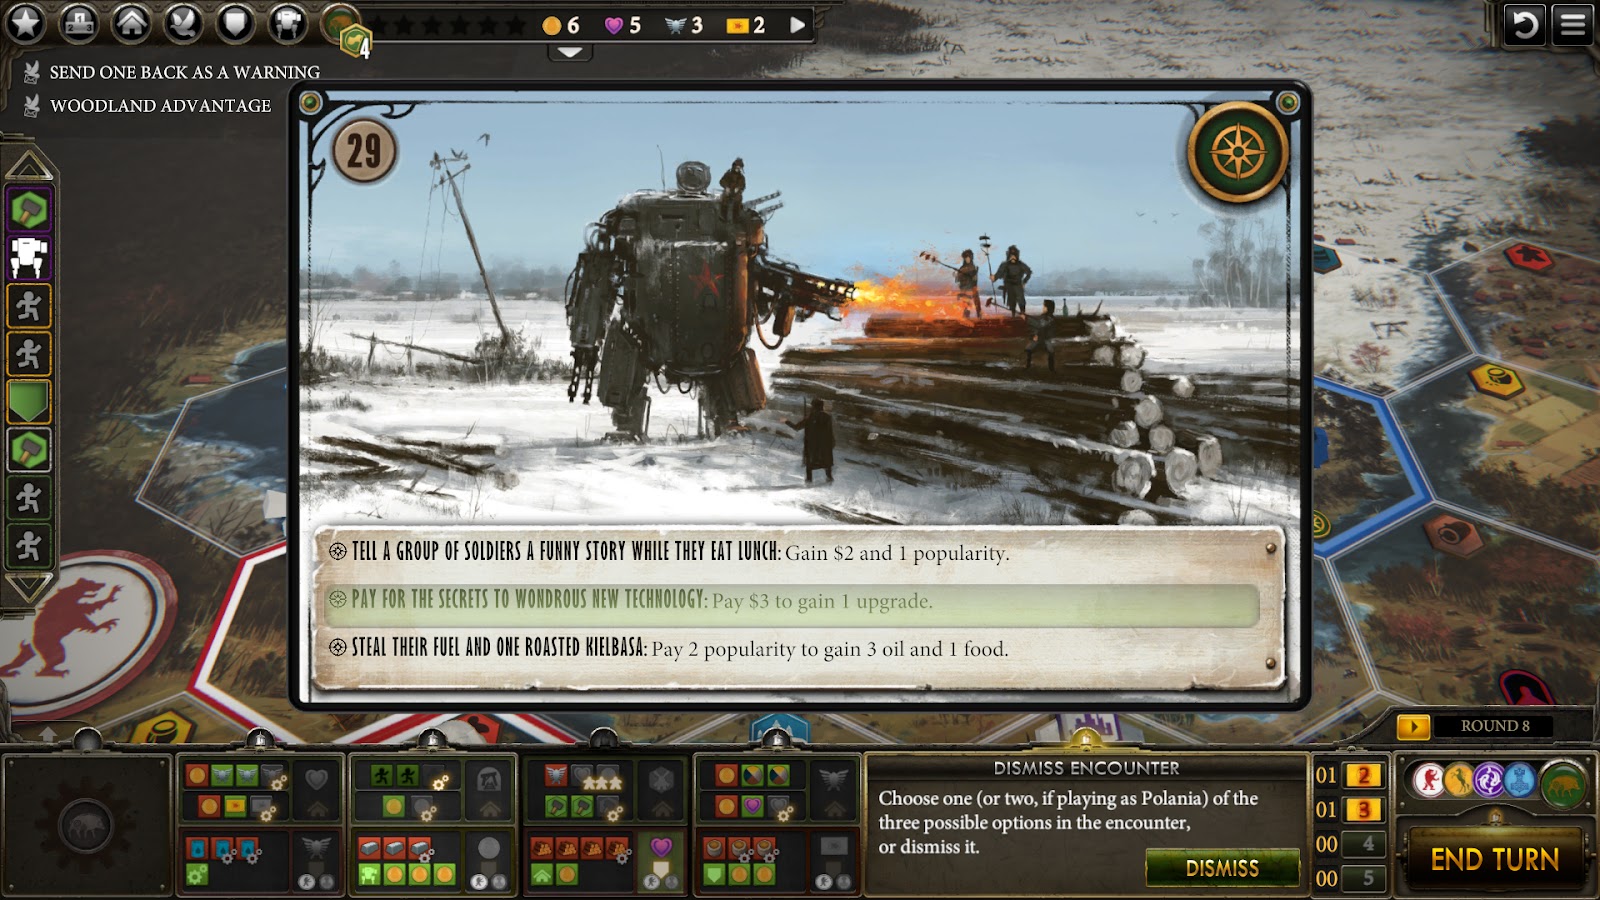
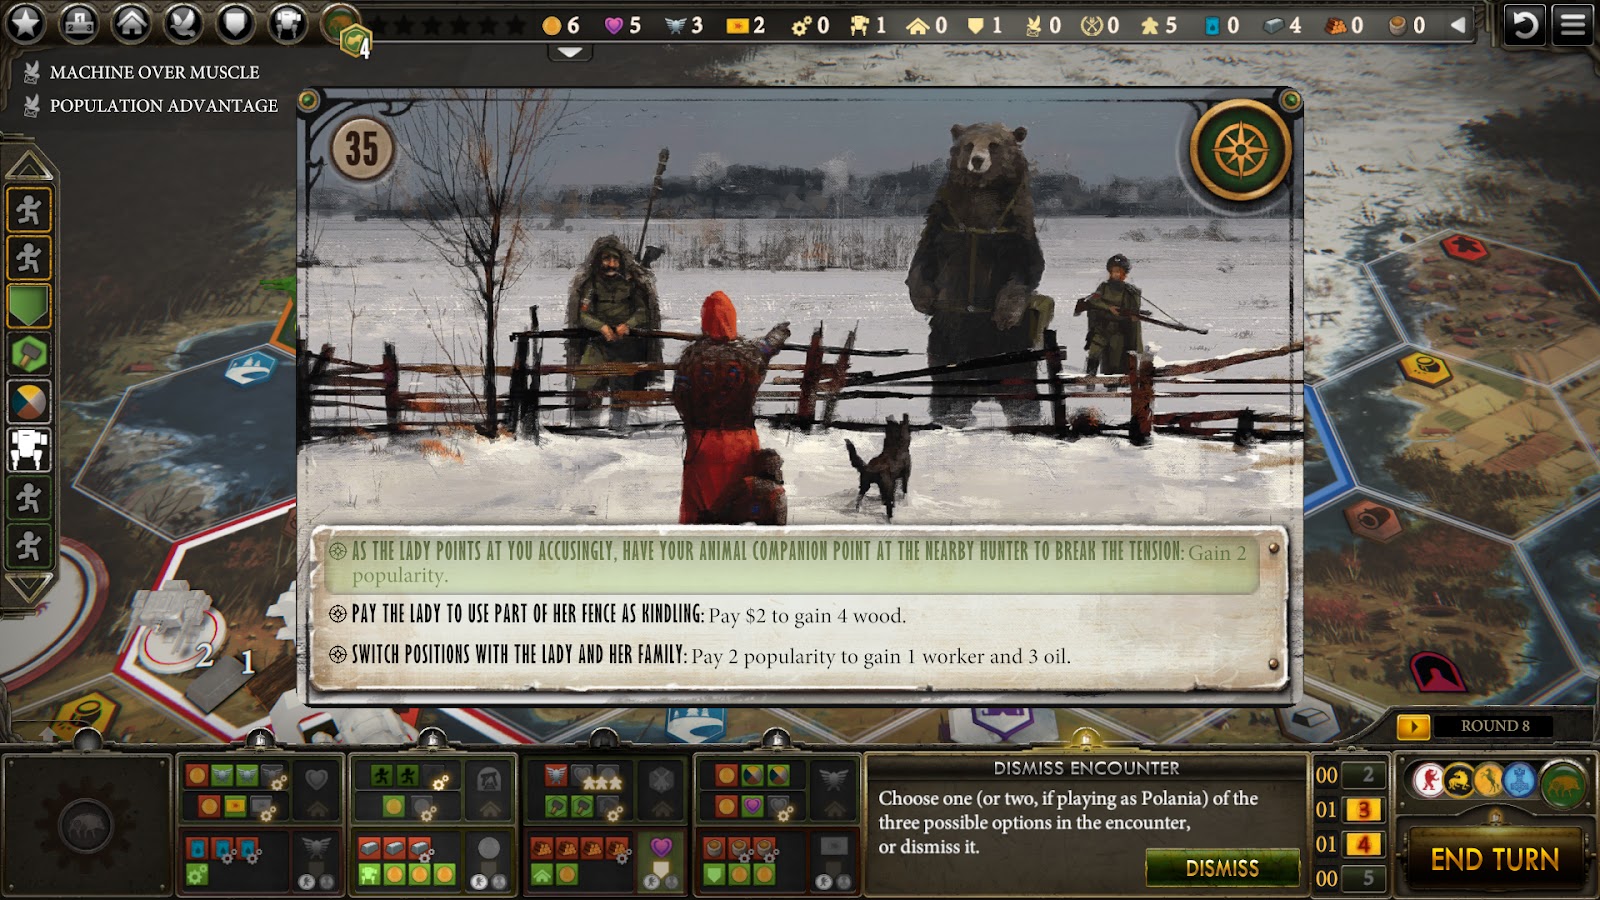
- Encounter options: We’d prefer an Upgrade most of all. Metal or Food would help shorten some turns. We don’t want free Mechs because we need the coin from our deployments, but we can take a free Enlist. We don’t really want Oil, but if it’s enough to Upgrade we can use a turn for that. Barring that, Power and Combat Cards are always a good choice for Albion.
- We received Encounter 29 and chose to pay $3 for one Upgrade (Move/Enlist). This is actually exactly what we wanted and will shorten our turn sequences by a round or two easily.
- PRODUCE: 3 Workers and 2 Metal. [Worker Star].
- MOVE: Mech + all 6 Workers to Farm, 1 Worker from Mountain to Tundra, Rally Hero to Tundra Encounter. DEPLOY: Shield on Tundra.
- We want one more Produce action and have to make it count, so we don’t want to leave a Worker on the Village as we might have done in other cases.
- Encounter options: An Upgrade, Food or Metal are preferred.
- We received Encounter 28 and chose to gain $2 and 1 Popularity. We don’t need any resources enough to pay for them and wasting our Popularity on a structure at this point will hurt us a lot. Plus, getting additional Popularity helps us get to Tier 2 Popularity scoring.

- PRODUCE: 6 Food and 1 Metal.
- This hurts our Popularity a bit, but it’s necessary to ensure we have enough Food for the remaining Enlists.
- TRADE: 2 Metal. ENLIST: Deploy / Power reward.
- MOVE: Hero, Mech + 5 Workers from Farm, Mech + 1 Worker from Mountain to Tunnel Mountain. DEPLOY: Sword Mech on Tunnel Mountain. [Mech Star].
- TRADE: 1 Popularity. ENLIST: Enlist / Coin reward. [Combat Star].
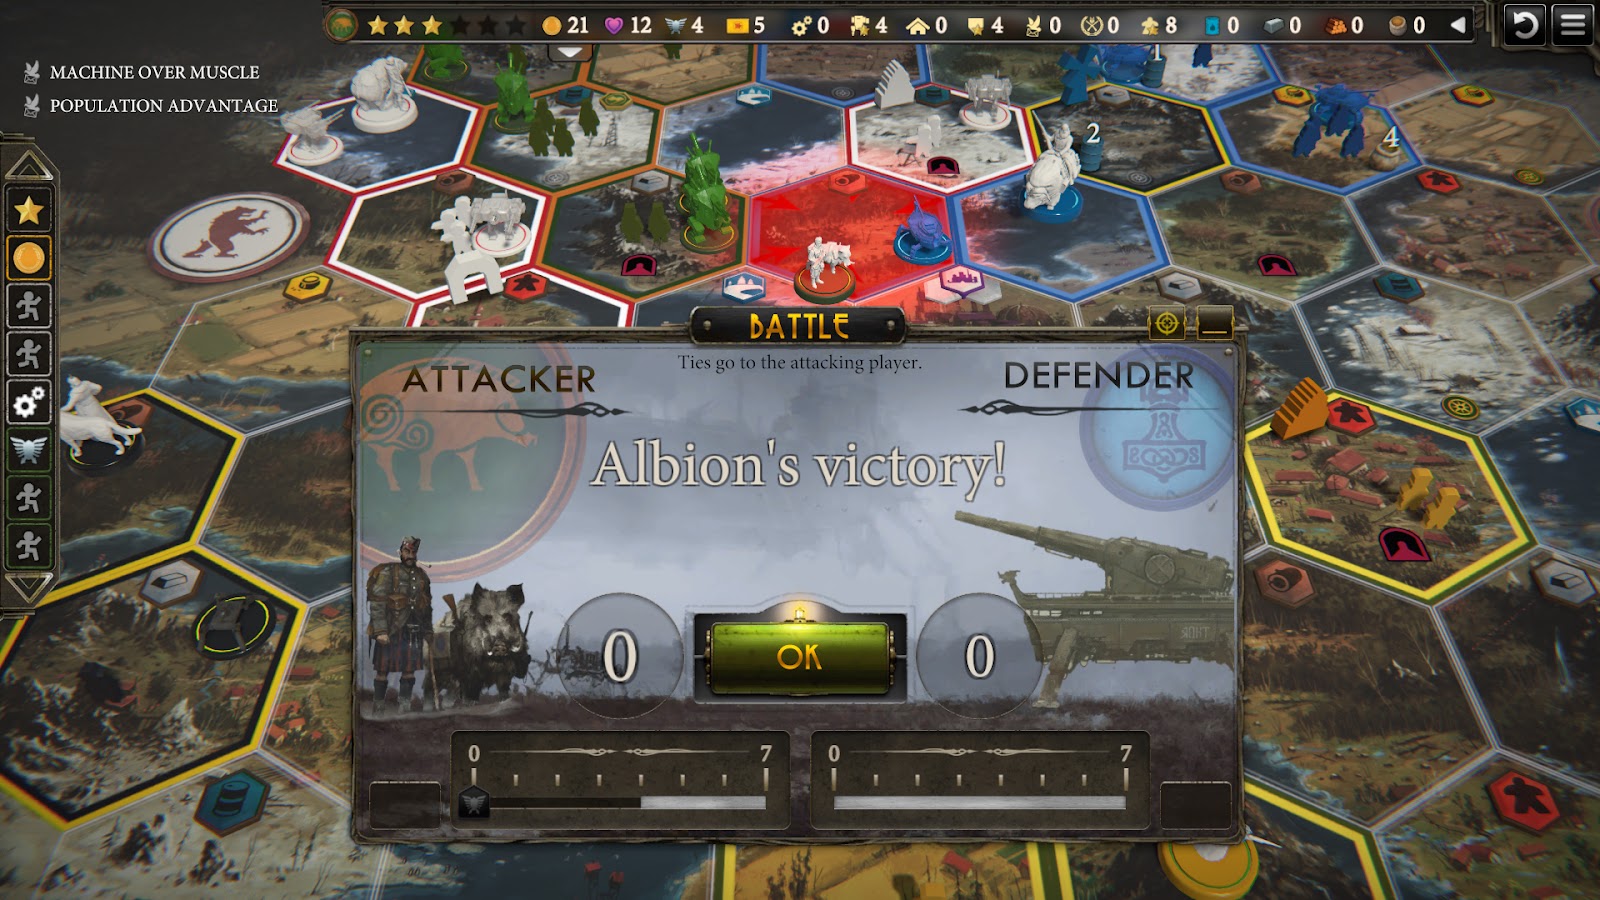
- Combat: After our turn, Nordic attacked us on the Tundra. They had only one Combat Card, but over 10 Power. So we threw a 2 Combat Card and lost to cycle another Combat Card.

- MOVE: Hero to Polania Forest (for Objective), Mech + 1 Worker from Tunnel Mountain and Mech + 1 Worker from Base to combat with Polania on N. Tunnel Tundra. [Combat Star].
- Combat: Polania had only 2 Power, and with our Sword ability, they lost that Power when we attacked. Aside from that, they had 10 Combat Cards. We could rest easy believing they would cycle a 2 Combat Card, which they did.

- TRADE: 1 Popularity. ENLIST: Upgrade / Popularity reward. [Combat Star].
- Combat: After our turn, Nordic attacked us again. This time on Polania’s Forest. They could only put up 7 Power with no Combat Cards, and we gained 2 Power from their attack, so we bid a 4 Combat Card and 4 Power to ensure we gained the victory.

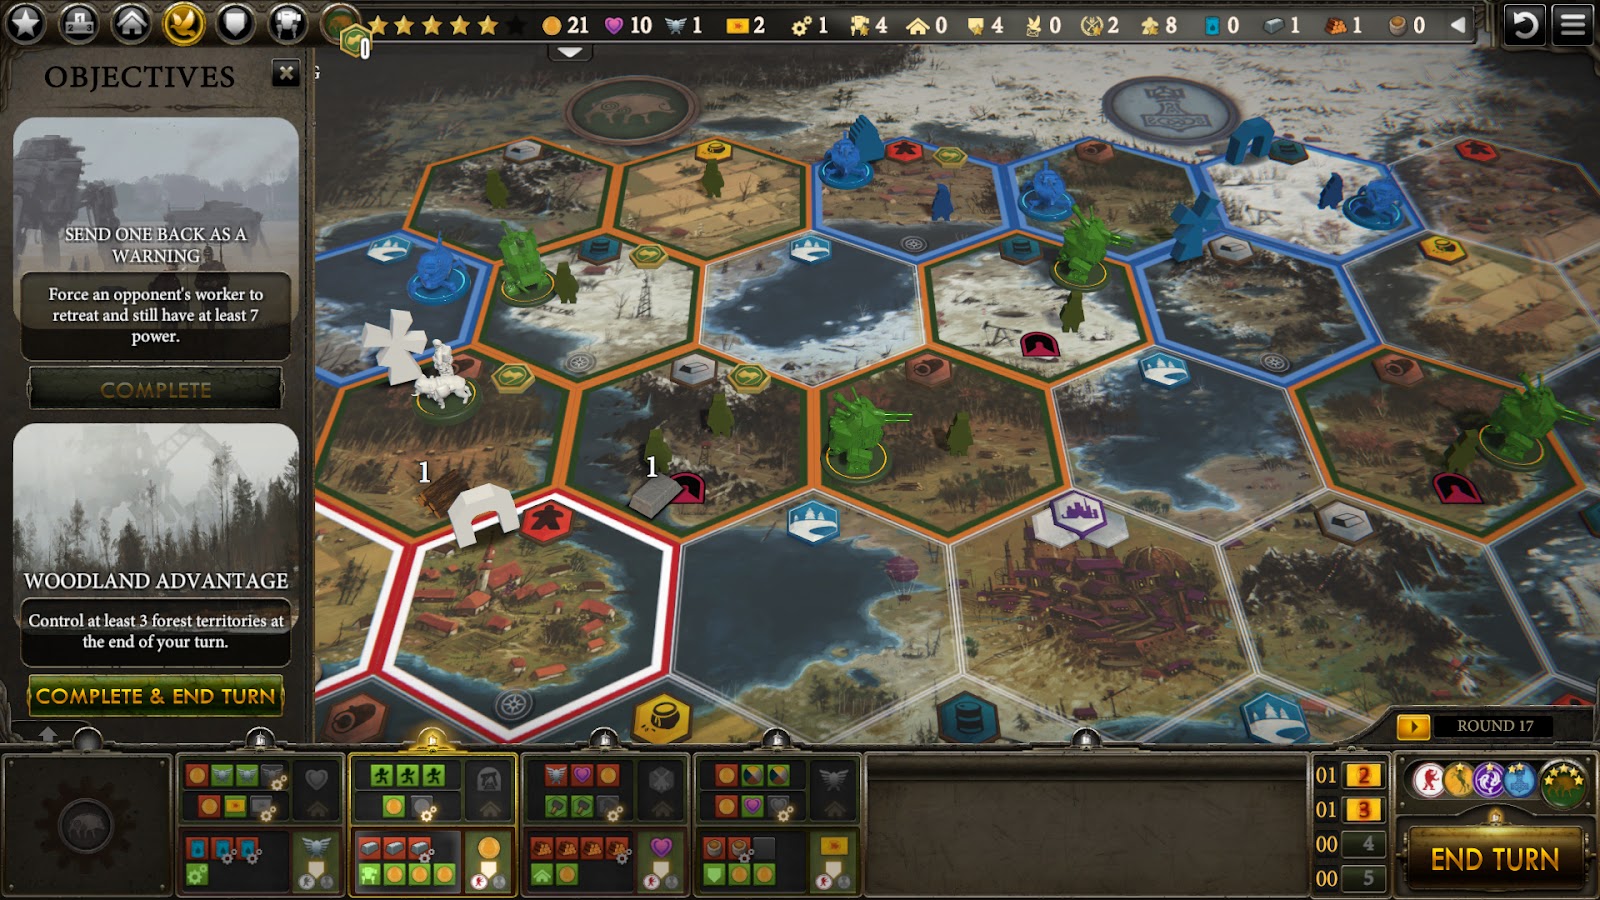
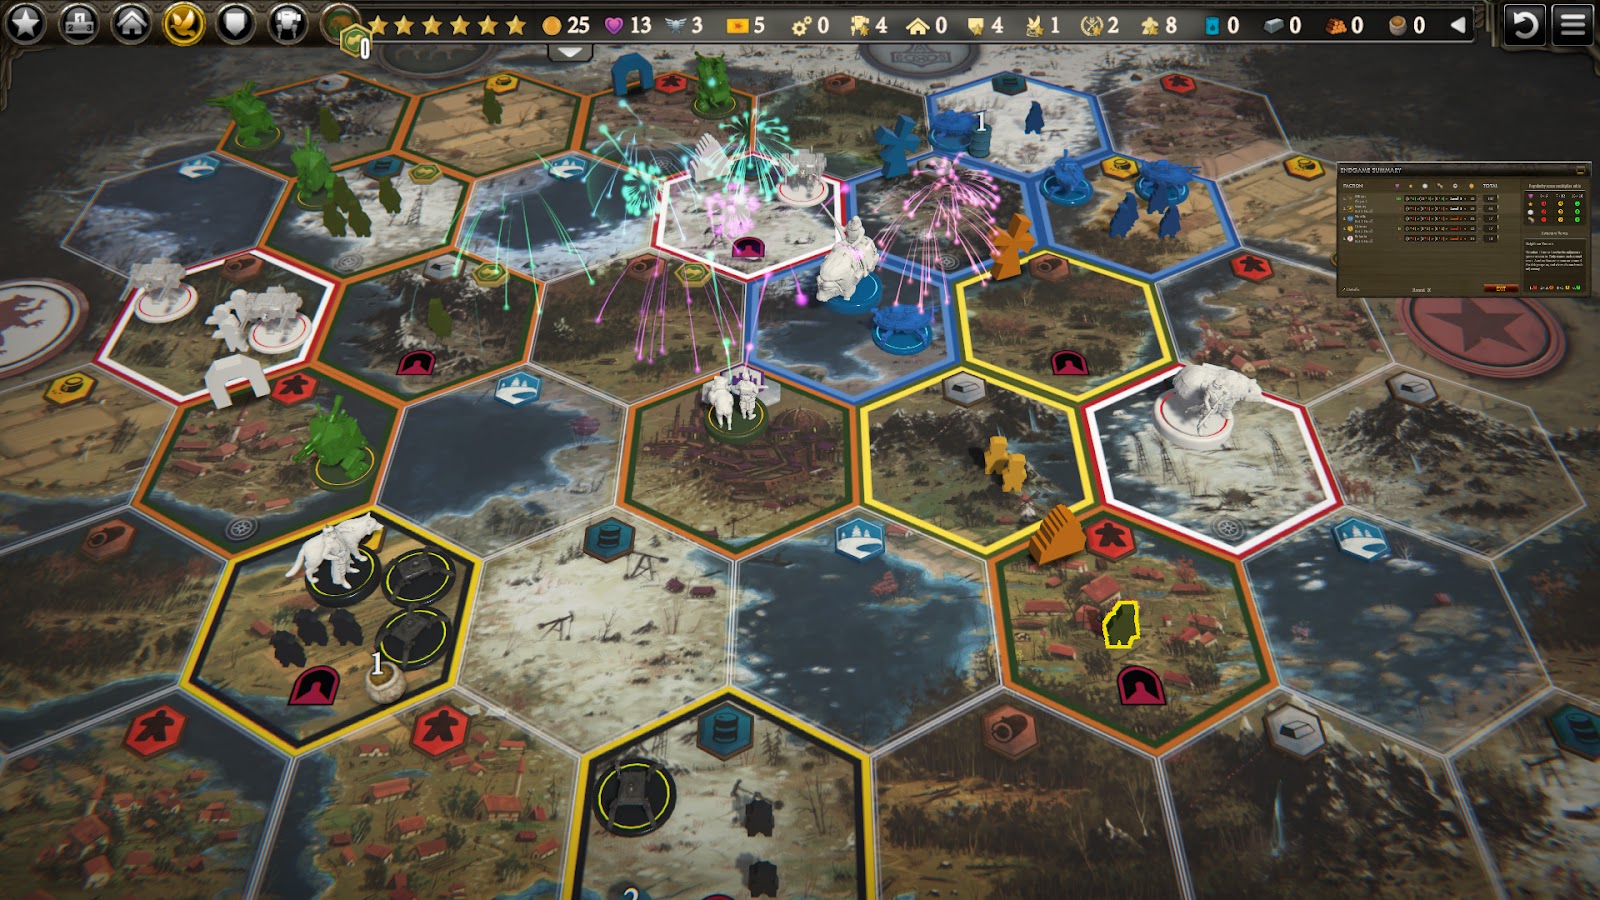
- MOVE: Mech + 1 Worker to Tundra, Mech +1 Worker to Tunnel Forest, and Mech +1 Worker to Factory Forest. [Objective Star].
- Thanks to Nordic attacking, we didn’t have to seek combat this turn and we only needed to ensure we spread ourselves out and got on two more forests to meet our Objective.
Thoughts and Tips.
Thankfully we had some decent things go our way. We got an Upgrade on our first Encounter and we got one of our combats on other faction’s turns. These little boosts helped us a great deal. The only thing that could’ve gone better would’ve been the second Encounter being something more useful.
As always, against the Scythe bots games are a bit more predictably linear, so even though I would say the opening strategy is sound against competitive players, it’s still not fool proof and will likely need adjustments. For instance; the likelihood of both our neighbors building structures is next to nothing with real players. We still may have gotten Tier 2 Popularity, but our first Enlist we probably would’ve gone for the Deploy action.

Step by Step Strategy Game Two.
Since we were able to get an Upgrade through our first Encounter in the first game, I wanted to show the same strategy without that benefit and illustrate how we have to adjust.
Objectives: Machine Over Muscle and Population Advantage.
- TRADE: 2 Metal.
- PRODUCE: 1 Metal, 1 Food.
- TRADE: 2 Food. ENLIST: Build / Combat Cards reward.
- Again, Nordic and Polania were on Forests and had Lumber. Might as well take advantage and get at least Tier 2 Popularity.
- MOVE: Hero to Farm, Worker to Village. DEPLOY: Rally Mech on Village.
- PRODUCE: 1 Worker, 1 Metal.
- TRADE: 2 Metal.
- PRODUCE: 2 Worker, 1 Metal.
- MOVE: Hero to Village Encounter. Mech + 1 Worker to Mountain. DEPLOY: Burrow on Village.
- We Deploy Burrow to have move movement options in case Polania traps us.
- Encounter: We’d prefer Metal, Food or an Upgrade to help shorten some turns. We don’t want free Mechs because we need the coin from our deployments, but we can take a free Enlist. We don’t really want Oil, but if it’s enough to Upgrade we can use a turn for that. Barring that, Power and CC’s or Populairy if that’s in reach.
- Encounter 35: We gain 2 Popularity. Paying $2 for 4 Lumber is tempting; however, not getting an Upgrade means we might have to stall the game by increasing our score.
- PRODUCE: 3 Workers, 2 Metal. [Worker Star].
- MOVE: Hero and Mech + Workers from Village to Farm. DEPLOY: Shield on Mountain.
- PRODUCE: 6 Food, 2 Metal.
- TRADE: 1 Food, 1 Metal. ENLIST: Enlist / Power reward.
- MOVE: Hero and Mech + 5 Workers from Farm to Tundra. DEPLOY: Sword. [Mech Star].
- TRADE: 2 Food. ENLIST: Deploy / Coin reward.
- MOVE: Hero to Tunnel Mountain, Rally Mech + 1 Worker from Mountain to Tunnel Mountain.
- TRADE: 1 Popularity. ENLIST: Upgrade / Popularity reward. [Enlist Star].
- MOVE: Mech + 1 Worker from Tundra to Tunnel Mountain, Hero to Combat with Nordic on Factory Forest. [Combat Star].
- Combat: Nordic only had 2 Power. Thanks to our Sword ability, we could take that Power away and win the fight for 0 Power.
- TRADE: 1 Popularity.
- Because we’re waiting on our Move action again to get our Objective and last Combat, I decided to use this opportunity to get us up to 13 Popularity, which is Tier 3 for scoring. Had this not been the case, we could’ve opted for Bolstering for Power or Combat Cards.
- MOVE: Hero into combat with Polania on the Factory, Mech to Polania Village.
- Combat: Polania was at 2 Power with a handful of Combat Cards. As with the Nordic battle, we took their power away and bid a 4 Combat Card and 1 Power to ensure we won.

- FACTORY CARD. MOVE: Mech + 1 Worker to Tunnel Village, leave worker, Rally to Albion Village. [Objective Star].


Thoughts and Tips.
As mentioned earlier, I wanted to illustrate the difference an Upgrade makes for Albion. Granted, we still got out 6th Star by round 20, but it took having a Factory Card which gave us the additional movement. Aside from that, we got to Tier 3 Popularity which is pretty rare in competitive games against real players; but even without, the point spread would’ve been enough to stall the game had real players been playing and threatening to end it with their 6th Star.
Additionally; this very combination had an amazing victory in tournament play recently – a round 14 win! This was so highly unexpected that it even surprised veteran players JoyDivision and FOMOF who are announcing it. Check it out here:

In closing, don’t let anyone tell you Albion can’t be formidable. They can, we just need different strategies and a little bit of luck to help us. If you haven’t checked it out yet, take a look at the general Albion Strategy where we cover a lot more of the detailed facets of the faction that will make this step by step strategy a lot more efficient.
As always, leave a comment on your thoughts below! We love to hear how your games go or if you have any thoughts on a more efficient strategy!
Happy gaming!
- Norman
2 comments on “Albion Militant Strategy”
Marc
August 24, 2020 at 2:05 pmVery much enjoy your strategy articles but dont see how this one works. In all games where Nordic plays they take the village first which throws off your turn 4 move and the entire time table.
TheDailyScythe
August 27, 2020 at 5:55 pmHey Marc!
Thanks for reading up. Let’s look at this scenario.
Playing Albion against Nordic is always going to be a gamut; but in my experience, Nordic players won’t take the Village on Albion’s side unless they have Innovative or Industrial (both mats allow them to Deploy a mech before Albion Hero can get there to bump workers). For Nordic, taking Albion’s Village right away typically sets them back further as once their workers get bumped back to base, they then have to spend an entire move action or a couple (if they have more workers than movement) to get back into decent positioning. It’s much easier and safer for Nordic to take the Village on the Rusviet side because Rusviet isn’t desperate to get that Village.
That being said, there are inexperienced players and/or players that just like to disrupt opponents, being willing to take some turn loss as Nordic to throw Albion off. For those, my recommendation is to adjust your turn sequence to Move Albion’s hero to bump the Nordic workers and get the Village Encounter right away. Because, as Albion, we don’t want a Nordic mech in our base hexes early game if it can be helped. From there you can return to the strategy or amend it as needed.
An example would be like:
TURN 1: Albion Trade for Metal – Nordic Move to Village.
TURN 2: Albion Move Hero to Farm – Nordic Produce.
TURN 3: Albion Produce – Nordic (something).
TURN 4: Albion Move Hero to Village, bump Nordic workers, Albion Move worker to Village. Deploy Mech. Take Encounter.
In this example, we’d be only one turn behind and we can then TRADE and PRODUCE our next two turns to get back on track. Or, if a better strategy presents itself due to the Encounter, we can modify and roll with that. The big downside will always be the loss of Popularity from bumping those workers, but there’s not much that can be done for that.
Now, in the case where Nordic has Industrial or Innovative mats and their first move is a worker to Albion Village and the other worker to Nordic Mountain, it means they’ll beat Albion to the punch and have a mech on the Village before Albion’s hero can get there. With Albion Militant, the turn sequence doesn’t necessarily have to change as by Turn 4 Albion will have Enlisted (probably for Combat Cards) and with their Move, Deploy a mech. Meaning, Albion can have both Hero and a Mech on their Farm adjacent to the Village with two Combat Cards ready for a Round 6 Move action into combat.
Anyway, good thoughts. I hope that helps shine some light on this scenario!
– Norman